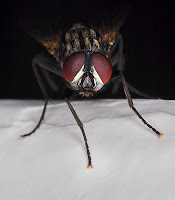
Above is my highest scoring DPC entry ever, What are you looking at?. Even more notable is that it got a 6.8 in a the November free study, and I was expecting about a 6. I guess DPC'ers like bugs; fly macros always seem to do super well.
Although, if you think about it, a fly is just about the perfect macro subject:
- They're all over the place. It isn't hard to find a fly on any given day, as opposed to something like a praying mantis. I haven't seen a praying mantis in decades.
- They like to hang out in one spot and are relatively docile -- I was within inches of the fly above and he just looked at me.
- They have great macro detail with large compound eyes, hairs all over their body, membranous wings, and interesting mouth parts. All at a level which we don't normally see, but is readily apparent at 1:1 or 2:1 magnification.
Getting the Shot:
He was buzzing around one morning while I was cleaning up the kitchen, so of course, I dropped the broom, grabbed my camera, and outfitted my camera with 20mm of extension tubes, my reversed Nikkor-H 50mm F/2, and my newly-made macro ringflash mounted on my Sunpak 383 in the hot shoe.
Then, I proceeded the chase the sucker around, blinding him with the flash whenever I could get a decent shot. The combination gave me approximately 2:1 magnification. It was also my first time using the macro ringflash "in the wild".
 The first place I got him (the "money shot") was when he landed on the corner of one of the plastered white walls in the kitchen (hence the moon-like texture on the white surface). The image has been rotated 90 degrees to the right, plus another few degrees to get the horizon perfectly horizontal. The shooting parameters were F/16, 1/200s, and ISO 100. I think the Sunpak 383 was at 1/4 or 1/2 power. At left is a high-res result of the file. I also posted a high-res shot on Flickr (but not as high-res as the shot at left).
I shot handheld, which ended up making focus super-difficult. The process was to depress the aperture lever on the Nikkor-H to open it up, lock my focus with the bright(er) viewfinder, then pop it back into the working aperture and take the shot without moving. At 1:1 I have no problems, but at 2:1 I had a pretty low success rate.
When I first looked through the images I actually didn't think the image was good. For one thing, I had screwed up the settings and not noticed at the time, making the image very dark. More on the extensive post-processing later. For another, I didn't get enough light on the back of the fly and I had wanted to get the wing detail.
When I looked the next day, I realized this image has a lot more punch to it than the others. While I am disappointed that I lost the wing detail, the light-dark contrast, fixed stare of the fly, and focus are dead on.
Lighting:
A few words about the lighting. Technically, I used on-camera flash since the Sunpak 383 was in the hot shoe and the macro ring flash adapter just moves the light down to the lens. But, from the fly's point of view, he was facing a 16 foot ring light about 6 feet in front of him which is about as off camera flash as you can get. Kind of makes the lighting a bit more nuanced than you might think. Also, the wall did a lot to both fill the underside of the fly yet shadow the rear part of the fly.
Yet, as nice as this shot came out, I generally feel that straight ringflash leaves macro subjects a bit flat and lifeless. The best use of the ring flash is in conjunction with backlight or side light, which I used on my later images of the fly. Remember, you can't get the donut catchlights when your subject has a compound eye!
Another thing to keep in mind, which worked to my benefit in this image, is that the light drops off very rapidly at macro distances. This causes the flash to be very bright on the front of the subject (an advantage since the ring diffuser eats so much light) yet very dark even a centimeter behind. So you need some sort of second light on your background if you don't want a black background. And ambient is really tough to work with since apertures are small and any camera shake is greatly magnified in macros. Another issue to keep in mind is any foreground items will almost always be blown out by the brightness of the flash.
My general macro scheme from now on will be to use the ring as fill and a second flash (or the sun) as a side or backlight. Ringflash only will be useful, but only if I really want to isolate the subject and darken the background.
 Post Processing:
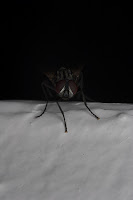
At right, you can see what I started with. Yeah, that's dark.
Really dark.
The problem was I had the lens at a larger aperture on accident, and when I stopped down I didn't boost the flash power or the ISO. Luckily, I shot RAW (like I usually do for anything remotely tricky) so I could address the problem in RawShooter Essentials. As I've mentioned in Quick Tip #7, RAW lets you save exposure problems.
So, the first step is to adjust everything using RSE. Here is a screen-capture with my adjustments (click to see it full-size):

I used pretty much every feature:
- Color balance adjustment was minimal. The copy paper changes the color of the flash a bit (turns it slightly blue I think) but the camera doesn't have too much trouble detecting it.
- I had to use almost two stops of exposure compensation, a bunch of fill light, added shadow contrast (deepening the blacks) and removed highlight contrast (which helps to not blow out highlight detail).
- Max the saturation. Gotta have those eyes red.
- Some sharpness and detail extraction. Honestly, probably not even needed since I downsampled it anyway.
- A decent amount of noise suppression.
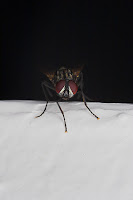
 The uncropped end result after RAW conversion is to the left. This has been resized and had a USM pass, but that's it. I converted into TIFF so I could continue to battle the noise and the darkness of the image in PSP XI; I probably boosted brightness almost another stop using curves.
The end result of the boosting of exposure (or pushing in film terminology) is the noise is equivalent to ISO 800. And for DPC, noise is bad. So I had to be real aggressive with noise reduction, starting in RSE, and then running two passes of noise reduction in PSP XI. In my opinion, NeatImage produces the best results and preserves the most image detail, but it doesn't work for 16-bit per pixel images. PSP XI is a relatively close second, and for whatever reason, RSE's noise reduction isn't that great, especially at higher levels.
 Other than that, I did a lot of localized sharpening, cloning, and HSV. Specifically, the eyes needed even more saturation and a little brightness boost, but not as much sharpening as the legs. Oversharpening the eyes made them look really bad. There were also a lot of noise-removal artifacts on the horizon, so I deselected those areas during the second sharpening pass.
Again, the high-res version (approximately 1/4 of the pixels of the original, a 50% reduction in each dimension) is at right. You can see it still doesn't have as much detail as can be represented in the pixels -- a factor of both an imperfect optical path and noise problems. Luckily, at DPC sizes (640pix) the image really pops and doesn't lack detail.
Conclusion and Bonus Image:
Overall, I'm really happy with the shot. Yeah, I'd love to get more detail and less noise, but I'm sure I'll take more pictures of flies. They really are impressive creatures that we rarely see up close.
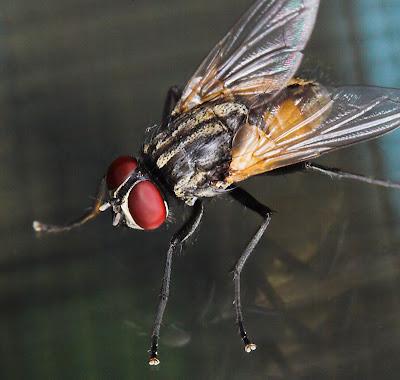
As I mentioned earlier, I kept shooting after the DPC shot and start experimenting with the ringflash and a hard side-light to bring out details in the fly. Most of the shots aren't great, especially since the fly decided to move onto our sliding glass door and got rather active, but I have one nice one to share with you below. This was shot at 2:1 (reversed Nikkor-H with extension tubes), 1/200s, ISO 200. The angle isn't nearly as dynamic, but I love the color and detail on the back of the fly.
Enjoy!


2 comments:
Hello. I was googling "fly anatomy" and this picture (along with others) appeared. I am working on a book about flies. This is an incredible picture and I see that adjacent to the picture is this notation: "Image may be scaled down and subject to copyright".
What sort of fly is this if you know? What country, etc.?
I have never asked about a copyrighted image because it has never come up for me. I would like to know if I have permission to use this. Will you let me know? Thank you in advance.
My general policy is I don't mind sharing for non-commercial use if I have attribution, but if you are selling the book we'd have to discuss terms a little more.
If you are interested, leave your e-mail in a comment and I'll delete the comment once I grab your e-mail and contact you further.
Post a Comment