Monday, March 31, 2008

The Expo Ray Flash: $300 for Only One Stop?


Strobist just put up a review of the ExpoImaging Ray Flash. The $300 unit, which attaches to the business end of an on-camera speedlight, looks very similar to my own homemade ring flash. Of course, I can't claim my DIY flash is a unique idea or nearly as good as this product.

From the product page, the secret of the light distribution is:

"...a sophisticated system of internal prisms, reflectors and light-shapers designed to distribute and project the light evenly around the lens..."
Well, darn, I guess I should have me some internal prisms.

Ok, ok. It may seem like I'm poking fun at the product, but I'm not... I'm poking fun at the price. $300? Really? 300 is the number in the Spartan elite guard, not the number of dollars you need for a passive flash modifier! You can't tell me that it can't be made for cheaper.

On the bright side, I think there's a lot of room for the price to come down once they reduce manufacturing costs. Or, maybe some Chinese company will steal the idea and sell it on eBay for $50.

************

Actually, from Hobby's description, it sounds near identical to my design:
"Speaking of engineering, this is a pretty impressive piece of optical design. It uses little light channels to guide the flash around the lens pretty darn evenly. Given that the top is closer to the flash, you know that is gonna be the hot area. But they counter it by not releasing the light fully until they are an inch or two from the top of the ring, going around. Seems to work great."
Releasing the light about a third of the way down the tube was one of my ideas to even out the light distribution. But, losing only a stop of light (or half the light energy) is really, really efficient.

The biggest drawback of DIY models like mine is that they eat so much light (I estimated a loss of 4-5 stops, although I suspect a stop or two of that is due to the office paper diffuser). When you lose 95% of the light, that doesn't leave much left over for lighting, especially outdoors. Obviously, there's something else going on here, and it'd be great if Mr. Strobist could help us DIYers reverse engineer the secret to maintaining such high output. Reverse engineering the product would probably go against whatever agreement got him an evaluation unit in the first place though.

Realistically, I won't be buying one of these things. If I have an extra $300, I'll buy a real macro lens or some studio lights, not a flash modifier. Sure, the extra output would allow me to actually use ring light for outdoor shots of things larger than a flower, but the price-performance ratio just isn't worth it to me.

That doesn't mean I wouldn't be willing to evaluate and review a unit for free, though... (hint, hint)

Sunday, March 30, 2008

Purchased: Tamron-F 1.4x Teleconverter

Well, I just purchased a used Tamron-F 1.4x Teleconverter from KEH Camera for $53 + $12.95 S/H. I decided that a teleconverter would be a worthy investment for shooting my son's baseball games since I need a little more reach than my Canon 70-200mm f/4 USM can provide and the Sigma 600mm would miss a lot of shots without autofocus.

In my survey of teleconverters, I stated that my first preference would be the Kenko Pro 300 1.4x. Sadly, the price on eBay has bounced up substantially and is now $120-$130 (including shipping). Since a few reviews have mentioned that I won't notice much difference between the Tamron-F and the pro versions, I figure $65 is a good deal for the Tamron-F. Oddly enough, the Tamron TCs are going for $75 or more on eBay, so the KEH price was pretty good (although the shipping cost is surprisingly high).

For reference, Amazon is currently charging $115 shipped for the Tamron-F 1.4x.

Hopefully I'll get it next week. I'll offer up a review once I've had some time to work with it.

Thursday, March 27, 2008

Review: RawShooter Premium (a.k.a. Professional)

I'll admit it, I'm starting to outgrow RawShooter Essentials. The biggest problem is it convolutes my workflow. If you don't know the term, photographic workflow is the process you use to get images from the camera to whatever final published state you desire. In a perfect world, your workflow will be efficient and yield high quality results every time. In reality, establishing an efficient workflow is difficult and a huge hassle.

Here is my current workflow which I've been using for the last six months:

  1. Take the memory card out of my camera and plug it into the reader on my computer. I can plug the camera into the USB port, but RAW files can't be imported with Picasa over USB.
  2. Use Picasa 2 to import the files. I've got it set up so all I need to do is type in a name and it automatically creates a folder based on the date in my Negatives folder along with a corresponding subfolder in my Processed folder. Picasa has great file organization and browsing abilities, but it hides a lot of functionality from you. For instance, if you import RAW files, it automatically runs an automatic exposure adjustment on it. The tools for RAW conversion, adjusting saturation, sharpening, etc leave a lot to be desired. And you can't apply a sharpening pass after you downsize. So I only use Picasa for managing my image folders now. It also uses a lot of memory so I hate having it open if I can avoid it.
  3. Fire up RawShooter Essentials (RSE) to make a first pass on the images. I delete the ones that didn't come out, mark the ones I like, experiment with RAW conversion adjustments to see if I can get the quality I want, etc. RSE is great for browsing images because it is super fast and responsive. You can also easily check the image sharpness at 100% pixels.
  4. Finish first pass of adjustments in RSE and convert. RSE has pretty good control over RAW conversion and it exports to 16 bit TIFFs if needed. I'll usually set exposure, white balance, add fill light, etc and apply a little saturation enhancement and noise reduction. Then I'll export the image into my processed folder at full resolution.
  5. Fire up Paint Show Pro XI to finish the adjustments. Usually rotation (if needed), cropping, noise reduction, clone/heal out dust spots, curves, saturation, resize, and sharpen, in that order. The really annoying thing is I can't crop or resize in RSE, so even for the quick snapshots which don't need much processing, I have to start up PSP XI (a pretty big program) to finish them.
  6. Save the finished images to my processed folder.

As you can see, this isn't the most streamlined process, and I've gotten to the point where I usually view the images in RSE then put off the rest of the workflow because it's so annoying. A side issue (which I'm not addressing right now) is I need a slightly better method of storing high-res edited images without cluttering my hard disk.

In a perfect world, I could combine steps 2-5 in the same piece of software. RSE is pretty efficient, but Picasa and PSP XI are pretty large and unwieldy. So, a couple of weeks ago, I decided to check out the alternatives.

The obvious one (and the successor to RawShooter since Pixmantec was acquired by Adobe) is Lightroom, but it's really expensive ($300). Canon is providing Digital Photo Professional for free now (you'll need your old software to upgrade though) and I tried out v3.2 but the interface was very difficult and annoying to use, plus it is much slower than RSE. Another one that is really well regarded is Bibble. Bibble seems really good to me, but I'm going to wait a little bit and then give it a full 30 day trial to see if I want to pay the $70 for it.

And then there's RawShooter Premium (RSP). RSP is the pay version of RSE which adds a number of notable features (I'll get to those in a second) and is generally seen as one of the best RAW converters out there because of its interface (which is nearly identical to RSE). The problem is, Adobe bought Pixmantec and RSP went *poof* -- you can't get it any more, even though it used to be available for under $100. It has had some great reviews in the short time it was available though. There's also an optional Color Engine for RSP, but as far as I can tell, the CE is just some color presets and good luck getting it anyway! Note: the cracked version of RawShooter Premium had a trojan horse in it -- I don't recommend downloading it!

Oh, and did I mention, I managed to acquire a copy of RSP quasi-legally?

Before I get to that, let me mention a little tidbit about RSE. A lot of people get frustrated with the splash screen/"register me" dialogs that pop up when you run it. Well, turns out there's a solution to that, found in this thread, downloadable here. Just fire up that little program, and you'll never see that annoying thing again.

Back to RSP. I love RSE, so I hard to find a way to get RSP. Adobe has pretty much abandoned RawShooter in general, so you can't find any downloads or demos around. Since it is a dead piece of software, I didn't feel too bad about finding a "crack" for it. I'd never do that for a live piece of software like Photoshop, but I felt like I couldn't get RSP functionality anywhere else. I'm not going to give a link, but if you want to find it, Google "rawshooter premium crack" and look around. I found a version by ICU but the link appears to be gone now with others replacing it. Whatever you do, use an up-to-date virus scanner on the file before you open it! You don't really need much beyond the program, since the executable will create the necessary support directories and files (except the documentation).


And, I gotta say, damn it's good!


RSP adds the following functionality to RSE:
  • Importing files from memory cards. It includes support for automatic directory and file naming too.
  • Rotation and cropping. Finally. This is what I wanted most of all. A lot of times when I'm in the keep/not keep phase, I like to look at some possible crops of the image before I decide. Plus, I'll often forget how I want to crop the image between when I first look through the images and when I get to process them.
  • Levels and curves. Another huge one, because I like me a little bit of curves on most images.
  • Vibrance slider. This thing is really cool -- it immediately boosts the saturation appropriately, like a good slide film.
  • Compare images. Can't tell which shot is slightly better? Now you can put them side to side and compare them!
  • Resizing. Now I can set it to save JPEGs at the right resolution to immediately post on the blog!
I can now simplify my workflow in a huge way. The only downsides of RSP are that I can't do any cloning and the output isn't quite sharp enough for my web aesthetics (I think it applies the sharpen before the resize?). So most of my photos will still get a quick pass in PSP XI, but there's a big difference between what I was doing before and the simple sharpen and save process now.

Granted, for heavy editing, I still can't get away from PSP XI. Like isolating colors for saturation adjustment, spot editing, or high quality noise reduction. But I'm really happy with RSP because I'm already used to RSE and it adds a bunch of features that make my life easier.


There's other big problem though: RSP doesn't support any newer cameras like the 40D or 450D. So if I get a new camera, I'm completely out of luck. I think of RSP as a temporary measure, and soon I'm going to do a trial of Bibble to see if it will work for me. One thing about Bibble I'm really excited about is the built-in heal/clone tool. Bibble might allow me to avoid PSP XI for most images, which would be a great time-saver.

Wednesday, March 26, 2008

Photoshop Disasters

Stumbled upon the Photoshop Disasters blog today.

It has been added to my Bloglines. Turns out, most movie posters are photoshopped together... badly!

Monday, March 24, 2008

Forrest M. Mims the Third

The book at left is what I found on my desk this morning.

The other week one of the guys in the lab had reason to breadboard an amplifier circuit so I handed him the Op Amp IC Circuits book pictured (o.k., not an actual picture of my book, but my book looks amazingly similar, right down to the brown tinge of the cover).

Forrest M. Mims wrote a series of electronics books for Radioshack in the 80s including Getting Started in Electronics and the Engineer's Mini-Notebook series. I taught myself electronics through his books (at the time, my goal was to build a computer, but we ended up buying one before I ever got close).

And, yes, my books really are 20 years old.

All the books were formatted using handwriting on graph paper, like the following page from the 555 Timer IC Circuits below grabbed from here:

That page brings back memories of many a flashing LED.

On a whim, I googled Mr. Mims. Turns out, he's still very active both in writing and science and has his own Wikipedia page. He is also a creationist (err... maybe intelligent design-ist?) and there was a well-publicised contraversy between him and Scientific American over his beliefs (read more here).

The reason he gets a post on this photography blog is he's done a lot of photographic documentation of science. In particular, I loved his time-lapse movie of frost flowers (apparently, some texas plant emits ribbons of ice when the temperature falls below zero). He's got some other really nice images on his web site, along with plenty of photographic documentation of his projects.

Forrest Mims is a great example of a successful amateur scientist. In my mind, his books are just as relevant today as they were 20 years ago if you are starting out in electronics. You can find them at his commercial site, www.forrestmims.com, and Amazon (below):

Friday, March 21, 2008

Choosing a Monopod

I've been considering a monopod for quite a while because my tripod (a Velbon CX-570) is too big, bulky, and sloppy to use with my Sigma 600mm f/8 Mirror lens. Also, with my son starting baseball this month, I expect a monopod will come in handy when I shoot his games with my Canon 70-200mm f/4L USM.

I have used the Velbon like a tripod (with all legs retracted but one) and determined that a monopod would definitely help me. I'll do a review of the Velbon in the near future -- the short version is that it has a lot of value for the price, but ultimately it isn't very good.

So, these are my notes for my monopod research.

As always, mouse over the product names to see the price and info at Amazon. Many of these items you can save a few dollars getting them somewhere else (like B&H) but Amazon is usually the best place to start.


How to Use a Monopod:

Before I get into specific brands, it is worth mentioning that monopods aren't meant to be used in the way most people want to (straight up and down, perpendicular to the ground). You can actually get a lot more stability by tilting the monopod and applying force on it in conjunction with your body. Since I don't have a monopod, I am not an expert in this, but these guys are:

The main thing to note is that both pages cite similar techniques, and most (if not all) of the techniques require at least one axis of tilt (two if you don't have a tripod collar and want to shoot in portrait orientation). In other words, a bare monopod really won't cut it because it will restrict your usage of the stick based on your shooting altitude. You really need to add a head too.


The Low End:

Like all aspects of photography, there's a consumer level of monopods in the $25-$40 range. Most notably:
While these monopods are a great deal for under $40 and all include a head, they all have maximum weight ratings around 5 lbs which probably isn't suitable for a dSLR if you ever plan to put a decent size lens on your camera. Also, the plastic heads will not hold up as well as other types.

So, for me, these aren't an option. My goal right now is to spend a little more and buy a monopod I can use for the next decade or two. If you have a small dSLR and don't plan on using a large telephoto with it, or if you have a small point and shoot camera, these options are a great value.


The Middle Ground: My Area

The next step up from the low end is the medium range with major players Manfrotto/Bogen (monopod line) and Giottos. There are some high-end companies like Gitzo but those monopods are beyond my means.

Manfrotto/Bogen:

(as yet, I can't understand the brand difference between Manfrotto and Bogen, so I use them interchangeably)

Originally, I was leaning toward buying into the Manfrotto/Bogen system with the Manfrotto 679 as my starting point. I played with one at Keeble and Shuchat and really liked the sturdiness of it. It is made to carry up to 22 lbs which is plenty for my needs. By the way, the Manfrotto 680 is nearly identical, but it has four sections instead of three (to be more compact), weighs a little more, and doesn't extend quite as high. Plus, it is more expensive. And I'm staying clear of the Manfrotto 676 because it only supports 10 lbs. If I'm going to get a decent monopod, I want it to be as sturdy as possible, even if that means it is slighter bigger and heavier.

Of course, even after I spend the $50 to get one of those 'pods, I'd still need to purchase a head. My goals for the head are at least once axis of tilt (to allow vertical orientation of the camera and/or altitude flexibility) and a quick release. I don't really see the point in the Bogen 3232 because it lacks a quick release, which is something I definitely want. The Bogen 3229 has the single axis of rotation along with a quick release, but I'm really leaning toward the Bogen 486RC2 because it is a full ball head, even though it costs twice as much as the 3229, more than the monopod!

The complete cost of the 486RC2 and 679 would be over $120. But, the advantage of spending more on the head now is that I could then buy a set of legs from Manfrotto for around $100 and use the 486RC2 to complete an entry level professional tripod.

Giottos

I was pretty much planning on the Manfrotto 679 until I saw the Giottos MM5580 P-pod. The MM5580 is an oddball because, for $80, it includes a tilt head, quick release, and extra legs.

Yeah, I said extra legs...

The P-pod part of the MM5580 is a set of three metal legs which can be screwed into the bottom of the monopod to make a tripod stand. You can't really expect it to be nearly as sturdy as a normal tripod, but it'd be an easy way to do hands-free long exposures or support the camera while you change lenses. Plus, it'd make a nice light stand! You can also screw two legs in near the top of the monopod to make a macro tripod, something which sounds pretty nice to me. The legs stow in the column when you aren't using them.

Of course, everything has a downside. The main downside to the built in quick release, head, and extra legs is weight; the MM5580 weighs twice as much as the 679 (about 3 lbs). Of course, a head with the 679 would weigh a similar amount. I'm also a bit concerned that the head and quick release of the MM5580 will be less than sturdy in the long run, plus, I won't get double duty and the ability to move the head to a set of tripod legs later.

The Giottos MM5580 does seem to be getting pretty good reviews (POTN thread).

Giottos also has a line of monopods and heads with similar prices as Bogen/Manfrotto. I haven't fully investigated the line because I was distracted by the MM5580. If I decide to not go with the 5580, I'll look into the Giottos aluminum line and compare it to Manfrotto.


What to do?

So, as of now, I have yet to make up my mind. I think it is one of those things that I'll be happy either way, but I need more time to scrape together the cash and verify that I really do need a monopod.

I'll keep you posted!

Update 4/7: I ordered a used MM5580 on eBay. Details here.

Tuesday, March 18, 2008

The Photography Business Mountain

I've talked before about the photography business and essentially decided it would be way too much work to start one and not financially smart.

I just found a really long thread on DPChallenge by Eyesup that really puts the expenses and amount of work in prospective. Especially notable is Eyesup's quote of Prof_Fate's back of the envelope calculations of how much it takes to keep a photography business in... business. Then, check out Prof_Fate's assessment of the expenses on 02/28/2008.

I'd love to quote some of it here to give you a bullet point idea of what the thread's point is, but if you are at all interested in starting a photography business, then read the thread.

What I will say is that, as a 'mom and pop' operation (meaning the husband and wife both work for the business) needs to bring in about $200K in sales every year to just break even (that does pay the 'salaries'). In this area (the San Francisco bay area) I'd expect you have to earn substantially more to break even ($300-400K). The real trouble is getting started, because you won't make nearly as much when you are getting going.

Photography is a hard, hard business...

Wednesday, March 12, 2008

Review: Sigma 600mm f/8 Reflex (Part 2 of 2)


The first half of this review is here with a follow-up here. I recommend reading those first.

This is the second half of my Sigma 600mm f/8 Mirror lens review. In the first, I focused on the physical characteristics and the ideal performance of the lens. In this part, I'll focus on how the lens performs in the field. And, as before, I'll start with my:

Conclusions:

  • The Sigma 600mm f/8 does have substantially better image quality than an up -sampled Canon 70-200mm f/4, but only if conditions are perfect.
  • The lens has high build quality but it is still a mirror lens with mirror lens limitations.
  • It is VERY hard to get decent pictures out of the lens since it has narrow depth of field, is very sensitive to camera shake with an equivalent focal length of 1000mm (even on a tripod), and is relatively slow (f/8). Expect to do a lot of shooting at ISO 400+ and expect to toss a lot of soft images.
  • If you are strapped for cash but need the reach and you can get a Sigma 600mm for $150 or less (in a mount that fits your camera or can be adapted to your camera), do it.
This lens is really a b**** to use. If you have your shutter speed a little too low, you'll get a crappy image. If you are wobbling a little, you'll get a crappy image. If you miss the focus, you'll get a crappy image.

Yet, oddly enough, I've had a lot of fun using it.

The primary reason for my enjoyment is that I can actually see details through the camera way better than with my naked eye (that may be partially due to my declining vision, but that's another post altogether). With a 1000mm effective focal length, my 20D and Sigma act as a 20x spotting scope. And, yeah, the manual focus takes some getting used to, but once I had more practice with it, I got pretty good at rapidly snapping things into decent focus. The focus wheel has great feel to it making focusing relatively easy.

So, that all said, let me go into some more details. I'll start with mirror lens limitations, which apply to any mirror lens, not just the Sigma 600mm f/8 (arguably one of the better mirror lenses out there). Then, I'll talk about the handling issues and my personal guidelines when I want to get a shot, and sprinkle in a lot of example shots all through the post. As always, click the images to see them larger.


Mirror Lens Limitations:

Mirror lenses are generally shorter, lighter, and less expensive than the equivalent refractive lens. Yet, mirror (or reflex, or catadioptric) lenses suffer from most (if not all) of the following limitations:
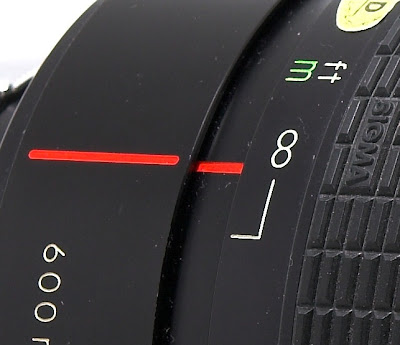
  • Fixed Aperture: Catadioptric lenses, by their very construction, cannot provide aperture control (to my knowledge; correct me if I'm wrong). The lens works by reflecting light from the outer donut mirror, off the front mirror, and then through a few refractive elements. I've heard of fixed apertures as large as f/4 and as small as f/13, but most fall in the f/5.6-f/8 range for 500mm lenses. Either way, a fixed aperture restricts your photographic options. The standard compromise of f/8 results in a pretty slow lens (using ISO 100 is difficult even in bright sunlight without a excellent tripod) yet a narrow depth of field for longer focal lengths (i.e. 300mm+). And, you have no way of adjusting to changing conditions.
  • Donut-shaped Bokeh: Bokeh is the appearance of bright (or dark) artifacts due to out of focus highlights. If a point light source is out of focus, it will appear on the image as a bright circle (or polygon). The bokeh on a catadioptric lens is not circular; it is donut-shaped. Turns out, donuts are very distracting to the eye because they have a lot of edges involved with them. Of all the mirror lens problems, this one annoys me the most.
  • Low Contrast: Catadioptric lenses tend to have lower contrast because of the path the light takes. In the modern digital age though, this is less of an issue because you can easily clean up the problem in Photoshop later.
  • No Auto Focus: There are a few reflex lenses that do autofocus, but most don't. In this modern world of auto-everything, lack of auto focus can really make it much harder to shoot images in fast situations. Likewise, newer cameras no longer come with focusing screens suited to manual focus, making the task that much harder.
Now that I've introduced the main problems, I'll give you illustrated examples of how that impacts me when I use my Sigma 600mm f/8.


Fixed Aperture: Keep Your Shutter Speed Up

As mentioned in the previous review, the Sigma 600mm has an effective focal length around 1000mm. By the usual shutter speed = 1/focal length rule, that'd mean I should get a substantial number of keepers at 1/1000sec. I've found in practice that I actually need to go a bit beyond that to get reliable shake-free images (around 1/2000s works pretty well). Even when I look through the viewfinder, it looks like one of those across the field shots in an NFL playoff when one of the team scores: shaking all over the place.


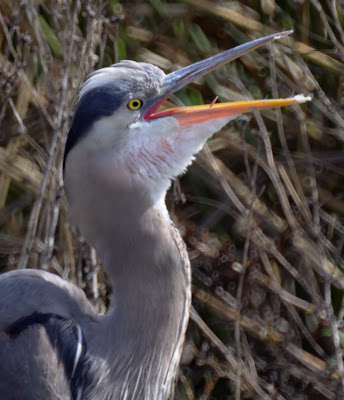
Fixed Aperture and No Auto-focus: Focusing is hard!

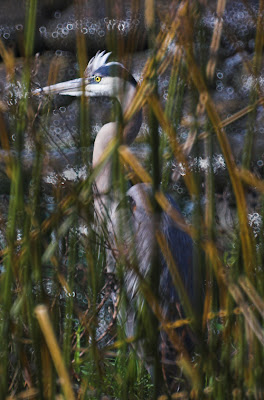
Depth of field narrows as your aperture widens, your focal length gets longer, and/or your subject gets closer. On a 600mm lens, an aperture of f/8 turns out to be really, really narrow. For example, in the shot of the bird above, look at the focus on the fence. The reasonable depth of field is only a few centimeters, barely enough room to get the bird's face in focus. Obviously, your focus needs to be right on to get a shot.

If focus is a little off, you get an image like this:

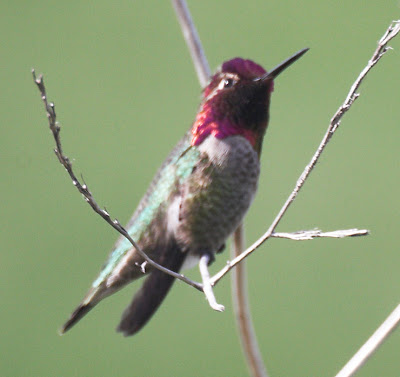
A great shot, except focus is a few centimeters too close. Darn.

This wouldn't be too bad, except you don't even have auto-focus to help you. I've found with my 20D's viewscreen I can nail the focus if I take my time (a few seconds) and take a few shots. The problem is, for fast-moving subjects, you rarely have more than a second to get the focus.
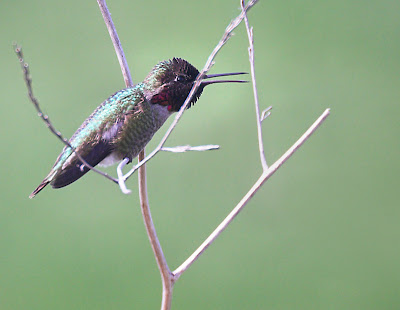
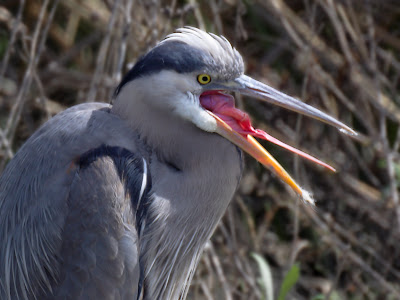


Donut-shaped Bokeh:

Mirror lens bokeh is the number one reason I'll be planning on upgrading as soon as I can.

A great (or really bad) example is the shot of the Great Blue Heron above. He (she?) was backlit and you can see how distracting the ring highlights are. To get any sort of decent image, you need to keep your foreground and background clean and uniform; this is typical for any photography, but a catadioptric lens makes any background clutter super distracting, even if it is just fine textures (like the image below).


Even lines like the branches below get hollowed out and distracting!


In comparison, here is a shot from the Canon 70-200 f/4. Note how the bokeh is there, but not distracting.


Also: Keep Your ISOs Up!

I don't think I've ever taken a shot with the Sigma at ISO 100 except for the testing images where I used a flash. And, while I'm looking into a Better Beamer or the equivalent, even flash isn't very useful when your subject is very far away. Most of my shots are at ISO 400 or ISO 800. Beyond that, noise gets really bad.

The good news is that the noise (which usually decreases the effective resolution of the camera once you've run noise reduction) has less of an effect when the lens already is already on the soft side. The end result is I feel like I can get 2-4MP images out of the 20D + Sigma instead of 8MP, but that's an ok compromise considering the cost.
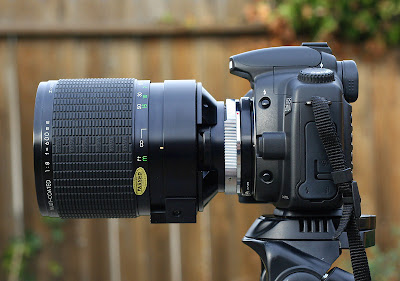


Handling: Not Bad

During most of my shooting with the Sigma 600mm f/8 Reflex, my camera looked like the image above. I pretty much always keep the hood on it (for protection more than anything else, but also to avoid any image flare). While it looks massive, the lens itself ends where the hood starts, and the overall assembly is easy to carry around and aim.

I've had a lot better luck with the lens on a tripod, mostly because it lets me lower the ISO a stop along with lowering the shutter speed to around 1/500s (about a 2-3 stop difference). I tend to screw the tripod into the camera since the camera is a little too heavy to properly balance when I screw it into the lens. Also, I can't seem to get my tripod plate to attach firmly to the Sigma, but I expect that is probably just my cheap tripod!

When I shoot, I try to snug the camera as firmly as against my face (using the eyecup) as possible and drape my hand over the lens to steady it. That's a little more complicated when I need one hand to operate the camera and a second to focus the lens. But it works out pretty well. I've used the tripod as a monopod with some success; a monopod is on my short list of things to acquire in the near future.

Attaching and detaching it from the camera isn't hard, but it isn't as easy as the EF mount (it is an older FD mount with breech-lock action. For some reason I always try to turn it the wrong way which is probably why the base of the lens got loose.

Also, I should mention I always shoot with the FD/EOS converter without the optical element. It turns out, since the Sigma 600mm f/8 focuses well-past infinity, I can get it to focus almost to infinity without the glass installed. By my estimation, this gives me maximum focus around a kilometer! I've been able to focus on planes traveling overhead with no problem... And why add another element to the optical path?

Once you get to know the lens and it's quirks, it really is a lot of fun to use!
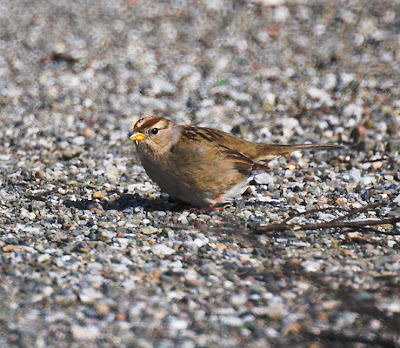
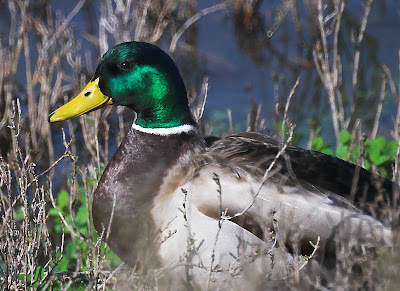
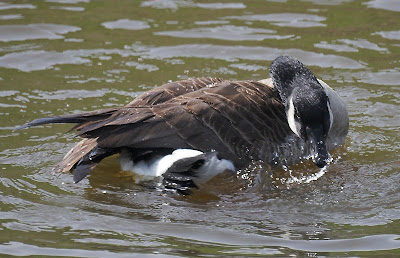

A Few (Good) Images

I'll leave you with some of my better images from the past few weeks that haven't been posted on the blog yet.


If you'd like to see more images, check out Jacob's shots (including a nice shot of a sparrowhawk).

Tuesday, March 11, 2008

Dirty Deeds Done Dirt Cheap

I feel dirty.

Not dirty like a rooting pig, but dirty like a shoplifter hiding soup in my pants. A soupy-panted shoplifter who's trying to start his own store.

Before I go too far with this analogy (arguably, I've already gone too far!), let me fill you in...

**********

My daughter's preschool has a professional school photographer come in twice a year to do portraits of the kids along with a class picture. Then, they send a number prints home for us to look at, purchase the ones we want, and return the ones we don't want. Included in the samples are a number of 8x10s and a few smaller portrait sheets.

By the way, I won't mention the name of the company, but it begins with 'L' and ends with 'ouch'.

My first thought when we got the first package was, "How dumb of them. They waste a bunch of money doing this."

That was until I realized how effective the scheme is. It's easy to say, "No thanks, we don't want to buy any pictures." Especially when you're poor, like us. But when they do the shoot for free, then actually put a prints in your hands, it makes your resolve soften a little. Ok, let's be honest, my resolve didn't soften much, but my wife's did. It doesn't help that my daughter photographs well (my son got sample prints in the same fashion, but pro photographers have a hard time getting a natural smile out of him).

Yeah, putting pictures in the family's hands is a genius move by this company that ends in 'ouch'. It gives that little extra nudge to help the photo-happy person in the family (played in this drama by my wife) sway the stalwart (that's me) toward the purchase. Who cares if it costs the company a buck a sheet to print them? I'm sure they get a lot more sales by doing it.

*************

As to why I feel dirty...

Well, my wife wanted one picture in particular (my daughter in a cap and gown) but the $12.50 a sheet cost was a bit too much for us to pay. She suggested I photograph the picture to copy it because it was a picture we couldn't get ourselves (well, I could, except we don't have a red cap and gown in extra small handy). I quickly volunteered that there is a scanner at work and the quality would be much better. Then I started hedging...

As I thought more about it (and especially at work while I was doing the deed) I started to feel dirty. How can I, a supposed photographer, copy someone else's work in good conscience?

Obviously, viewing the image is ok, they sent it home with us! Scanning the image for our archives seems reasonable. But, printing a copy for relatives definitely feels wrong (my wife convinced me to do it in the first place by suggesting that we don't pass images or prints on to anyone else in the family). But what about printing a copy for ourselves... doesn't that seem ...dirty... too?

Of course, this is all coming from the guy who actually felt guilty about software piracy in the 90s (that doesn't mean I didn't do it, I just did as little as possible and felt guilty about it when I did do it).

***********

So what did I do? I scanned the image in question along with the class picture but kept the DPI to 300. Between the quality of the scanner (not great) and the JPG compression, that makes reprinting the shots at 8x10 a stretch. For now, we'll just keep them in our archives of unprinted images. Later on, if we decide we really want a good quality 8x10 from it, we can go back to L___ouch and pay for a reprint.

Obviously, I can't post the image in question here. That'd definitely send my moral meter off the wrong end of the scale...

As my wife said, we should just blame it on my daughter: she's just too cute!

Monday, March 10, 2008

Recommendation: PicLens 1.6 for Firefox

I've known for a while that Firefox has some cool add-ons but I've held off adding any to my home computer... until PicLens that is. What an excellent photo browser, MUCH better for Flickr than the standard interface. It also lets you browse most of the other major photo repositories, including Google Images!

It lets you quickly scroll through a bunch of images to find those you like, automatically loads more as you go (no more clicking the 'next' button!), and has a seamless interface for scrolling, viewing them full screen, and playing a slide show.

A good way to get an idea of how PicLens helps you is this video:


Really, though, there is just no substitute for trying PicLens out. I will warn you, it is relatively processor intensive, so avoid it if you have an older computer. It is supported for Firefox, Safari, and IE.

Sunday, March 9, 2008

eBay/Blogger Editor Kit Fix

This has nothing to do with photography, so most of you will probably want to ignore it.

Anyway, I've found that eBay tools are a great addition to my blog since I talk about a lot of used equipment and it adds a lot to my content to have live auction listings right in my posts.

Generating a revenue stream larger than what I get from Adsense with no cost to my readers isn't bad either :) [For actual value, think 2 burgers a month instead of 1].

Anyway, the new eBay To Go widget is very nice for providing live searches on my pages, but it doesn't allow me to use a SID to track which pages are getting the most clicks and purchases. Here's an example for a SB-20 search:


Pretty nice, right? My only complaint is I can't apply an SID, it is shockwave flash (meaning it is slower to load), and it is more complicated (not necessarily a bad thing).


The other alternative for displaying searches is the eBay editor kit. The editor kit allows me to set an SID in a custom search box, but looks really crappy on blogger, like this:


So a spent an hour today trying to track down the problem (this thread is my main source). It turns out that the default blogger template has the CSS code:
.post img {
border: 1px solid #E3E4E4;
padding: 2px;
background: #fff;
}
This causes all images to have a 1 pixel border and 2 pixels of padding... even the hidden images in the custom editor kit display!

The solution is to create a new CSS entry to turn off the border and padding inside of a ebayEK class:
.post .ebayEK img {
border: 0px;
padding: 0px;
}
Then, just put span tags with the ebayEK class around the editor kit code to make the problem go away:
<span class="ebayEK">
... ebay code here ...
</span>
This results in a display like this:


Much better, right? Now custom editor kits are not trashed anymore...

Thursday, March 6, 2008

Backyard Garden Macros


Bear with me...

The final installment of the Sigma 600mm f/8 review is coming along, but there's a lot of images to include. It'll take a few more days to finish.

For now you get some macro shots...


I took the Canon 100mm f/4 Macro out back to give it a little try (note this is an old FD mount lens, not the newer Canon EF 100mm f/2.8 Macro USM). Not a real test, just messing around a bit.

The main reason I took it out was to shoot an albino spider I spotted (no idea what species it is, maybe it is a juvenile, if spiders have such things?). The first sequence was backlit by the sun:


After a number of shots (including the image that opened this post) I grabbed my flash and tried backlighting with the sun. Sadly, the spider moved, so none of the shots were really what I was looking for, but it does show that the Canon 100mm f/4 Macro can perform decently.


BTW, these last two shots are cropped to less than half the height of the original frame (the spider was tiny, maybe 7mm long?). As it was, I was using the 100mm (which gives a little better than 1:2) along with a second extension tube to get down near 1:1. I used a tripod but the wind was blowing decently, causing the blurriness in the sun-only shot. The flash sharpened it right up though.

The image that opened this post is a 100% crop (if you click on it) showing the spider's fangs. I will admit that I applied sharpening to it. Pretty cool, huh? (FYI, that one was without the flash)

Finally, I'll end with a closeup of a flower (this was maybe 1:4?). I just liked the colors and the contrast between the texture and delicacy of the point. My wife knows what kind of flower it is, but I forgot...

Monday, March 3, 2008

Sigma 600mm f/8 Reflex Performance Addendum

Truthsayer asked the following question in a comment:

Why are you comparing a 200mm lens to the Sigma 600mm?

That's an excellent question, and probably an indicator that I rushed the last post (Part 1 of the Sigma 600mm f/8 Reflex review) before it had all the explanation it needed. So I'll try to fill in some blanks about the performance of the Sigma 600mm in this post.

Before I go on, I need to specify that I'll only be discussing the pure, best-case, performance of the Sigma 600mm. In real-life use, the Sigma 600mm will generally not perform as well as these 'ideal' test shots. So this is more of a theoretical discussion of how well the Sigma 600mm performs rather than what to expect out of it when you use it. In my next post, I'll discuss the real-life use of the lens and its many handling quirks.


So, why compare the Sigma to a Canon 70-200mm f/4 USM?

1. The short version is that I had the Canon 70-200mm handy. It is currently my only telephoto lens.

2. The slightly longer version is that the Canon 70-200mm is similar to the existing lens of someone interested in purchasing a Sigma 600mm (admittedly, the Sigma is a budget lens). A better comparison would probably be one of the 70-300mm consumer zooms, or even the Canon 70-300mm f/4-5.6 IS. Comparing the $100, 20 year old Sigma 600mm to the $7,000 Canon 600mm f/4L IS USM or even the $1,000 Canon 400mm f/4L USM would be just rude.

3. The real reason is that I wanted to validate my purchase. If my tests conclude the same thing as this guy (that a 600mm shot is no better than an upsized, high quality, 200mm shot), then there is zero reason to keep the lens around. I could get shots just as good (and with less struggle) using the 70-200mm. That conclusion would make me very sad.


And what did I learn?

Well, luckily, my tests showed that the Sigma 600mm f/8 Reflex can easily achieve more detail than an upsampled shot from the 200mm end of the Canon 70-200mm f/4 USM, as shown in the comparison shot below:

Left: Upsampled Canon, Right: Sigma 600mm 100% crop

Essentially, for shooting pictures of birds or other far away objects (like the moon) I should be able to achieve a substantially more detailed image using the Sigma. Obviously not super sharp, but better. That makes it worth keeping around until I can get a used 400mm lens.

After I read Truthsayer's comment about getting a 1200mm effective focal length, I started to wonder about the Olympus series of cameras. It turns out Olympus dSLRs use the four-thirds standard, meaning their sensors are smaller than Canon APS-C sensor and use a 4:3 aspect ratio instead of 3:2. The image at right (from Wikipedia) shows the relative sizes of the various digital sensors.

I dug a little further and found that those Olympus photographers have really put a lot of testing into the OM mount version of the Sigma 600mm. For instance, this thread provides a well-done review of the 600mm and concludes that the lens is pretty darn soft. And this thread concludes the same thing, along with a discussion of many of the other reflex lenses that are out there.

Some observations and comments:
  • The first review/thread actually gives MTF50 measurements for the lens, which is something I've seen nowhere else.
  • The second thread has a lot of handling comments that I'll echo in my next post.
  • There may be an adjustment method (screws under the center obstruction) to get the lens in better alignment. I'll check this out when I get home.
  • The second thread has a moon picture which is softer than mine. I think I got a good copy of the lens and it works better on a Canon than an Olympus due to the sensor size (more on this later).
  • Sigma lenses are prone to mold (I knew that!).
  • The Zuiko 500/8 Reflex is very well respected, but it goes for $300+ on eBay. Not worth it to me since it is still going to suffer from most of the handling drawbacks of the Sigma. Here's a good comparison including the Zuiko.
I think the main problem for Olympus/four-thirds owners is that their smaller sensor size (a little more than half the area of the APS-C, and a quarter of the size of a 35mm frame) is exposing the optical deficiencies of the Sigma 600mm mirror lens. I would urge Olympus users (or other 4/3 bodies) to stay away from the 600mm Sigma or at least go in with reasonable expectations.

Luckily, on my 20D, the Sigma performs a bit better just because the pixels aren't as close together!


MTF Discussion (Geeks Only!)

Ultimately, it comes down to spatial resolution, or line pairs per millimeter (lp/mm). In the business, this is called a Modulation Transfer Function (MTF). MTF is a trait of both the lens and the camera. I don't want to describe MTF50 in detail here, but if you are curious, look at Imatest's page on MTF or Bob Atkins' page on MTF.

Imagine what's happening in your camera: light enters the lens, gets refracted/reflected, and then is projected onto the image plane inside the camera. If the lens is good, then the image on this plane will be very sharp (very narrow lines can be distinguished). But to get a sharp image, you also need lots of pixels to resolve the image projection from the lens. MTF is thus a factor of both lens and camera, with the limiting factor (lens or camera) deciding the overall MTF.

So, imagine the Sigma 600mm f/8 projecting an image onto 35mm film. The lens designers did what needed to be done to get decent MTF (lw/mm) on film. Not perfect, of course, but most people who have used the Sigma 600mm f/8 on a film camera have been happy with its performance. Now, take the same lens, and stick it on a 4/3 camera. Since the 4/3 image sensor is half the height of film, even though the lw/mm is the same, we've got less total lines/image on our sensor. And, as a result, the overall image is going to look like it has half the spatial resolution and appear softer than the image on film. In First Light's post, he quotes an MTF50 on his E-1 of 703 lp/ph. But, on 35mm film, that would be around 1400 lp/ph, which is generally considered to be a good resolution.

Note that I switched to lp/ph (line pairs to picture height) for this argument. On my 20D, FL's figure equates to around 800 lp/ph (it is actually a little higher when you consider the difference in aspect ratio). Not great, but only a little on the poor side of good. That pretty much summarizes my experiences: all my images are soft and probably comparable to upsampling an image from a decent 400mm lens.


Conclusion:

It isn't that the Sigma 600mm f/8 is so bad, but it works better on larger sensors. And for my purposes, since it outperforms my other telephoto lens (a Canon 70-200mm f/4), it will sometimes find itself on my camera.

As an example, here's a shot which I could never have gotten with my Canon 70-200mm:

American Tree Sparrow (?), Sigma 600mm F/8, 1/2000s, ISO 800

Ok, well, I could have gotten it, but it wouldn't have as much detail. The image above is nearly full frame; click it to see it at 1600pix!