
So I'm not updating at the rate I normally do because my parents are in town visiting and I'm a bit busier than normal. As a result, my posts this week will also be shorter than normal, although that's probably a good thing, because I tend to be long-winded (just ask my wife).
Aidan of That Photo Over There left a note on my final Canon EF 70-200mm F/4 USM Review about the light-painted image I used to start the post, so I thought I'd explain what went into the image. Aidan just started his blog but his posts are already high quality. In fact, he recently reviewed the Centon FG105D, a cheapo flash which includes an LCD and multi-flash (turns the flash into a strobe light). It can't sync with the eBay triggers though, which is definitely a problem. I'll look into it for the multi-flash capabilities alone; there are a few gimmicky pictures I'd like to try which require a strobe.
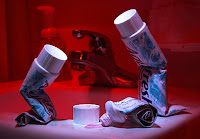
Ok, back to the lens photo. The technique used is Light Painting: the use of a moving continuous light source to illuminate the subject and/or produce light patterns on film. It was an outtake for Light Painting III at DPC that just wasn't interesting enough (I ended up submitting Dragon Dad, which had flawed execution but was conceptually good). The previous light painting challenges at DPC have some amazing images, check them out (LP1, LP2, LP3). I didn't take a picture of the set-up with the lens in place, but it was the same set-up as the image at left (click to see larger). I covered a box and the background with a black blanket, using a book underneath the blanket to lift the subject up. The camera was placed on the tripod shown and I used the flashlight (a blue mini-mag light) with black construction paper snoots/light guides to control where the light fell. The snoot shown is a narrow angle one that I didn't actually use for the lens -- instead I used a 6" cylindrical snoot with a 3/4" diameter.
 The object in the image is a little wedding statue my wife has, pictured at right. This was one of my favorite images of my outtakes; I just love the soft lighting you get from moving the light source. I've been using light painting more lately because of the increased control over the source, hardness, and direction of the light (especially useful with reflective objects).
I shot in RAW to give me some leeway in exposure. For the wedding picture, the stats are ISO 100, 20 second exposure, and f/11. For the lens picture, the stats are ISO 1600, 30 second exposure, f/20. I used ISO 1600 to allow f/20 and a huge depth of field.
I used two main tricks for the lens picture:
- The projected light. The projected light is not photoshopped in, it is the light cone produced by placing the snooted flashlight behind the lens (shining into the glass). To register it on the image, I taped thin blue tissue paper to a plastic spoon and moved that paper in front of the lens (along the path). I did clone out a little gap in the cone, but that was minor (and only in this image).
- Dual color light on the lens. So, after I traced the light cone, I removed the flashlight from behind the lens and painted the lens itself, taking care to get light in front of the lens (to show the opening) and highlighting the 70-200mm text. Then, at the last minute, I put a red gel in front of the flashlight and put some red back lighting on the lens to add a little more interest and separate it from the background.
 Overall, I probably did maybe 30 pictures over two days to get a lens shot I was semi-happy with. Light painting is a bit like performance art. I like it a lot, and I used the technique on my toothpaste image at right (click the image to go to the DPC page).
The best part is, light painting doesn't require any expensive equipment, just a flashlight, a tripod, and your camera. Make sure you use mirror lock-up (if you have it) and the self-timer (or remote release) to trigger the exposure. I also recommend getting a gel swatchbook (1 cent at B&H) -- the little gels work great for holding in front of flashlights (or taping to the front of your flashes).
And, if you do any light painting, leave a comment, I'd love to see the results!


2 comments:
Heh thanks for the mention. :)
The way you got the focused light to become visible is clever - after you wrote about that I switched the kettle on and found that a ray similar to that actually *is* projected.
I don't know why I didn't think it did, seeing as I did a year of AS Physics...
:S
No problem Aidan. I like what I see at your site.
My next project is to see what happens when an image is projected, but I have to figure how to have an image beamed in one end and still have the other end dark (and make the image recognizable).
Post a Comment