Wednesday, May 30, 2007

Putting Up a Shingle: A Business Plan

If you are a regular reader of this blog (all two of you) you know I've been hinting at going into business for a while and lately I've been promising a business plan but have been procrastinating intensely. Well, no more, this needs to get done.

The basic structure is an outline listing what I have, what I need, what I need to get done, and what I need to learn. As I address each issue, I'll put up a separate blog entry but link to it from this page (and link back to this page). That should keep things nice and organized. If I've solved/settled an issue, it will be in green, if it needs to be done, it will be in red (and if it is somewhere in the middle, it will be some other color).

So, how to start? Well, I'll just loosely model it after the example business plan at Bplans.com. For convenience, I'll refer to the 'company' I create as SUPhoto, even though it is pretty much going to be me (and possibly my wife). I tried to make my first draft all business-like, but it didn't seem... right. So, I've adapted it to my blogging voice, but using the basic structure and some of the terms.


Executive Summary:

SUPhoto is an on-location portrait photography company specializing in families and children on or around Stanford campus. SUPhoto will be positioned as an alternative to Sears or Walmart for middle to low income families such as those in Escondido Village on Stanford campus. Above all, the goal is to provide high quality, unique, on location portraits at an affordable price.

As a graduate student on Stanford campus, I feel that there is a big gap between the budget portrait studios like Sears and Walmart and area photographers willing to travel for on-location portraiture. Most of our friends and neighbors stretch to pay the rent each month, let alone pay for portraits once a year, yet all of the families near us have young children and like to do portraits (pressure from relatives and grandparents also helps). I am uniquely situated in contact with a large number of young families, in close proximity to the scenic Stanford campus, and in tune with the financial strain of our prospective clients. Furthermore, the close proximity of my neighbors allows word-of-mouth marketing to be very fast and effective (as past experience has shown -- rumors get around REALLY quickly).

My overall goal is to develop SUPhoto to be a reliable source of part-time income within a year averaging one sitting per week. Ideally, I'd like to get to that point by Christmas season, but I'm unsure if I have the time to do it, especially since I've already got two jobs. I have no desire for a full-time photography company -- I've looked at the numbers, and it seems like a lot of work and I would burn out quickly.

Beyond family photography, I would like to explore/add other specialties such as babies (including in-hospital or in-home) and senior portraits. Senior portraits, in particular, might be easy for me because I already have a lot of contact with juniors in my SAT prep job.

Action Items:
  • Determine legality of senior portraits from contacts made in my other job.
  • Do a few (free) trial shoots of seniors to see if it is feasible.
  • Once established, explore baby photography.

Start-Up Costs:

The good part about location photography is the start-up costs are minimal. If I was trying to build up a studio with strobes, my costs could easily get to be a few thousand before I can even take any portraits. I also have almost everything I need to get started right now, but a few necessities are needed. Honestly, this is a cross between a shopping list and an inventory, but it will help me get organized.

Other than a few more pieces of equipment and a generous donation of time, I have everything I need for minimal shoots.

Camera Equipment:
  • Wide-angle zoom: Tamron AF 17-50mm F/2.8
  • Telephoto zoom: Canon EF 70-200mm F/4 USM (yes, that is why I bought the lens so quickly)
  • 90-100 mm F/2.8 macro prime (ok, who am I kidding, I don't really need this...)
  • Super-wide zoom lens (like a 10-22). Not as necessary for portraits, but it could be useful for specialty shots.
  • Back-up camera body (or a new primary body): Canon 30D (or 20D). While a new camera body is a big expense, it will prevent me from having to cancel shoots if my camera dies. It will also allow me to have a wide and telephoto lens at my disposal for special events without swapping lenses. Update: I'm planning on a used or refurbished 20D, just need to scrape the money together.
  • Carrying bag for camera equipment (lenses, camera, batteries, cards, etc). It needs to protect the equipment, but be easy to carry and give me quick access to the equipment on a shoot.
  • Lighting bag to carry lighting gear (if not contained in above).
Lighting/Misc Equipment:
  • A reflector for outdoor shoots not using the sun.
  • A second light stand.
Admin/Software:
  • Label maker for the CDs I burn.
  • Custom envelopes for print delivery.
  • Establish which software to run the viewings in and purchase it if required.
  • Establish workflow, back-up, and storage procedures.

Legal Issues:


Luckily, there aren't too many legal issues to worry about, but there are a few things I need to establish:

Products and Services:

One of the hardest parts of non-studio photography is to distinguish your shots from snapshots that the client could make. Because they aren't going to pay you much if they think they are just paying for you to use a slightly fancier camera that they could use themselves if they didn't have to be in the picture. But if they know you can get professional looking shots that they can't, they will pay you a premium for that expertise. So it is important for me to distinguish my portraits from 'standard' shots.

Obviously, with my experience, I should get the technicals correct (like exposure or focus) more often than an average Joe (or Jane). I think where I can really distinguish myself is the use of off-camera lighting, which is something average people have no ability to do, and it lends a little something extra to the photo that will catch your eye. The difficult part of that is actually doing the lighting, which I need a LOT more experience with. I'm going to try to do that this summer.

Beyond that, I need to decide what I will (and won't) offer my clients. Definitely, I won't be offering an indoor studio, simply because I don't have one, I don't have space for one, and I don't have the money to rent time in one. That may be something for after my next move, but right now, no.

My basic model will be a sitting fee along with a CD for them to purchase. I feel strongly about giving them full re-print rights to the CD (but not the copyright) and increasing the price of the CD accordingly. I'm not against offering prints, but I won't use prints as a way to make my money like most photographers. With my demographic (educated and frugal families) their BS-o-meter will be triggered if I try to charge them $5 for a 4x6 and tell them if they want any more pictures (or to scan it) they have to pay me more. I'd rather make them pay a little more for the sitting and CD and not count on reprint sales.

Action Items:
  • Learn outdoor lighting with reflectors and flashes. And not just a little, I mean really make my pictures pop with it. Probably a great first step will be to go through Strobist's Lighting 102 to force myself to practice the techniques.
  • Come up with my sequence. For instance, first we have a pre-shoot chat, then the shoot, then the viewing, then delivery and follow-up. There's a lot of rough edges along the way that I need to smooth to make it better for the client AND save me time and stress.
  • Set up a calibrated editing, viewing, and printing system that reliably produces good results. I know how, but haven't done it yet.
  • Come up with the valuation of the CD. How much is a CD worth? Should I include all high-res images or only those that they select? How many images should I process for them?

Market Analysis:


Before I set my prices, I really need to figure out what the going rate in the area is. I feel that I can price myself slightly above Sears or Walmart (especially for the sitting fee, since my clients won't pay for reprints). But I'd also like avoid underselling myself too much since it is a business after all.

Furthermore, I really need to know what my target audience (young families) is willing to pay. If I price myself too high, I won't get many clients, but if I price myself too low I'll be undervalued.

Action Items:
  • Survey area photographers, specifically on-location family portrait prices.
  • Do a similar survey for senior pictures.
  • For the TFCD shoots I do for my friends, ask them after the fact (and maybe before) what they'd be willing to pay for my services. That should give me an idea of what a typical family is willing to set aside for portraits.
  • Based on the market surveys, determine exactly which services I will offer and what they will cost.

Marketing Strategy:


This one's easy. For now, just word of mouth, e-mailing my friends, and maybe a post on Craigslist. Craigslist or other classifieds, in particular, may not be worth it because there are a lot of photographers posting on there, and in order to do it, I really need a web site...

Also, for each of my TFCD shoots, I'll provide each client with my price list and let them know they got a discount and how much it would have cost them without the discount. Then, when they talk to their friends they have knowledge about my pricing and/or give them a card.

I should also set up a website, but for now, just an entry here might do the job. A more formal website could wait a little while until I've built my portfolio and have time to set it up.

Action Items:
  • E-mail friends to set up TFCD shoots before July.
  • Create a card.
  • Create a price list.
  • Create a website.

Financial Plan:

I really have no money to sink into this business since we are just scraping by as it is, so the primary financial rule is to not spend money that I don't have. In a sense I have already done that (by buying my camera equipment) but that's where the line between hobby and business gets really fuzzy. I'm fine with donating time to the cause, but I'm willing to sacrifice the look of a business in order to reach profitability as fast as possible. Initially, profits will be just rolled back into the business (even if it is just to reimburse me for equipment already purchased).

If I can earn enough money from selling within our local area, then it will be time to look into web-site hosting, printing cards, advertising, etc. Mostly, I want to be able to pull the plug within the first year if I decide it is necessary without harming the financial stability of my family.

Action Items:
  • Account for cost of all equipment and software purchased so far, so that I can include that in the cost of doing business and reimburse myself for those expenditures.
  • Create an accounting spreadsheet (or system of spreadsheets). Alternatively, identify free or inexpensive accounting software I could use for that purpose..
  • Determine the cost of doing business for bare-bones shoots. This includes equipment costs, my time, gas, CDs, printing costs, etc. This number is necessary to make sure I am not losing money just by staying in business.
  • Determine break-even point. How many shoots do I need to do to stay in business? What if I expand?
  • Project into next year so nothing catches me by surprise.
  • Determine tax law, what needs to be reported, and what deductions I can make for SUPhoto business expenses. Did you hear that IRS? I'm not doing this under the table (well, unless I only do one or two shoots and give up).

Personnel:

Obviously, I'll be employed part-time by SUPhoto, but what about an assistant? I used to think an assistant was a luxury, but after doing two shoots, I realize just how helpful it would be to have someone to set up and keep an extra set of eyes to let me focus more on the portraits and poses. It would also speed the shoot up and make the clients feel more comfortable. But, obviously, finding good help willing to work for very
little money is hard.

My wife has offered and part of me thinks it is a great idea, and part of me is a little worried. On one hand, she's detail oriented, can do make-up, and could be very helpful. On the other hand, we're both used to being in charge and I'm concerned we might clash a little bit (mostly because I have trouble giving up control). The biggest problem: if my wife and I are on a shoot, where are our two children? Having my two kids on a shoot would be way more stress and trouble than any benefit to having my wife there. So we'd need a babysitter, but if we can't find one that will work for free or a swap, it probably won't be cost-effective.

Action Items:
  • Take my wife on a shoot to see how it goes.
  • Determine the value of having an assistant on a shoot -- would a local teen be able to help? What can I afford to pay?

Tuesday, May 29, 2007

How Do They Make Lenses?

Somehow I missed this my first time through Strobist, but there is a nice YouTube video which shows how lenses are made. Admittedly, it is a bit retro, but it answered a lot of questions I had. For instance, I've always wondered how they grind lenses and pack them in the barrel.

Since it is appropriate, I added a picture of my only retro lens. I guarantee the polishing process was similar to the video back when the Nikkor-H 50mm F/2 was on the assembly line.

While I was at it, I'd figure I'd find a few more 'inside the lens' pages:
Then I got thinking... exactly how old is my Nikkor-H? So I did a little research which led me to this page of Nikon Lens Serial numbers. My lens's serial number is 3578810 which puts it as made sometime in 1977 (coincidently, I was also made in 1977!). It's amazing how a precision mechanical lens from three decades ago can be picked up for $20 or less on eBay!

I also realized something else: I have an AI lens, not a non-AI as I initially reported. I could have easily figured that out but it never occurred to me to check. This page makes the difference between the different Nikon lenses clear. Oops!

Monday, May 28, 2007

Quick Tip #7: Save Underexposure With RAW


On Saturday night I shot my second set of free portraits on location at Stanford University.

Sounds fancy, doesn't it? I like saying "on location", even thought I only traveled about a mile to do it. But I digress...

One more digression: the business plan post is still in the works, but I wanted to get this post hammered out while it was fresh.

Anyway... The shoot went pretty well, if you consider me running from place to place like a headless chicken "pretty well". We were rapidly losing light and rapidly losing the patience of the young lady. I proved my inexperience a number of times, starting by shooting the first series using my Tamron 17-50mm at 30mm (not horrible, but not as flattering to noses as it can be). The real mistake was when moving from the first location lit directly by the setting sun to the second location in one of the many semi-shaded walkways -- I forgot to switch from manual (for the flash) to aperture priority. I also never chimped during the sequence (because I could tell they were coming out well). The result was an underexposure of 3+ stops and while I let my clients know and reshot at that location later, the expressions on their faces the first time were better than the second.

The sad part is this stuff happens, even to experienced photographers (although I'm sure pros have it happen very rarely compared to someone new like... uh... me). Thank goodness RAW is there to save the day. I was able to save this image (the split before/after image is at the top of this entry, click to see larger) and will include it in what I show the clients.

The beauty of a RAW file is that it holds more information than a JPEG (which I discussed earlier) allowing you to compensate for underexposure, and in some cases, overexposure. I'm still trying to figure out exactly how much overexposure is needed to blow out a RAW file. In my case, I had a Canon .CR2 file, but I'm sure you could do all this with the Nikon equivalent.

Technically, there should be no difference in image quality between RAW and JPEG if you have your lighting and exposure right. But mistakes happen...

I try to shoot RAW any time the photos are more than snapshots and it'd be difficult to replicate them. Sometimes, if I am doing people pictures in a controlled environment, I'll use JPEG even though quality is something important (like a contest). For everything else, I use either RAW or the RAW+JPEG combination. The RAW+JPEG is nice, but I find it slows me down in post processing so I tried pure RAW on Friday and I didn't miss the JPEGs at all.

Let me take you through the process of saving this portrait:


1. Here's a 200% crop of D.'s hand approximately how it would look if I had been shooting JPEG. Obviously, it is way underexposed.


2. The first step is to increase the exposure in RawShooter Essentials (RSE). In this case, I went up a full three stops (the max) and added some fill light, along with a little saturation and white balance. Much better, but we amplified the noise when we fixed the exposure!


3. So, my first attempt to reduce the noise is to use RSE. I pushed the Noise Suppression slider up about half way (Color Noise Suppression seemed to have no result on this image). I use a little noise suppression in almost all the images I convert in RSE. I find RSE doesn't do as good of a job as other software, but it also never hurts the detail in the image.


4. The result still wasn't good enough, so I took the RSE result (without noise suppression, #2) and ran it through Neat Image (NI). Neat Image is a great piece of software which can even integrate directly (plug-in) with PhotoShop and Paint Shop Pro Photo XI. Of course, I'm a cheap guy, so I've only used the free version which lets you save high quality JPEGs. I rarely use any of the sliders and options since the auto-profiler does a great job on my images. At right you can see a Neat Image in action -- if you've never seen it before, click to see the full size screen capture and prepare to be amazed!

PSP XI also includes pretty decent noise reduction ("Digital Camera Noise Removal") but I generally prefer Neat Image if image quality really matters and/or the noise is severe.


So, that's it. The end result is that shooting RAW let me save an image that would have been destined for deletion, and I'll show the (processed) version to the client with the rest of the images at the viewing. After all, they did a great job (and helped me out by posing) and I'd hate to have good poses lost from my own incompetence!

Along with that, I think I'll start shooting RAW only for my portrait sessions. The ability to save myself from exposure mistakes is well worth the increase in file size.

Saturday, May 26, 2007

Canon 70-200mm F/4: First Test Drive

The Canon EF 70-200mm f/4L USM (see how I got it cheaply) arrived Tuesday, but other than shooting a few shots inside, I didn't get a chance to really test it until yesterday. I was halfway to work when I realized I had forgotten some library books due that day, so I turned my bike around and rode home to get them. When I pulled on our court, a heron was standing at the corner. It was a perfect time to test the lens!

Luckily, he stuck around long enough for me to grab my camera and pop the new lens on. He and I then stood around staring at each other for about a half an hour while I got over 60 shots. Of course, none of the shots were remarkable because he didn't find any gophers to eat and I wasn't heartless enough to scare him into flying away just to get a good picture.

First impressions of the Canon EF 70-200mm f/4L USM:
  • It is long but not nearly as heavy as I thought it'd be. It handled pretty well on my little XT, but I can see how the tripod mount would be useful. Apparently 3rd party mounts are much cheaper (~$50) than the Canon mount (~$140).
  • The length of the lens doesn't change during zooming or focusing (an awesome feature).
  • The included hood and bag are really nice.
  • The USM is super quiet and fast (but my Tamron 17-50mm f/2.8 is pretty fast too, but it sounds like angry bees). I had a little trouble focusing on the heron, but I think that was more my Rebel XT not finding it's skinny little neck. The ability to hold the focus ring, autofocus (without the ring turning) then turn the ring to tune the focus is very useful (also called full time manual).
  • The zoom ring is opposite of Tamron lenses. Not a big deal, but all my lenses have been Tamron to this point so I keep turning it the wrong way :(
  • I think this would be a good lens for outdoor sports, but it'd probably be good to get a monopod and tripod mount ring because it is hard to hold it steady at 200mm for long periods of time.
  • Image quality is quite good. So far, I've only shot wide open at F/4, but it is nice, way better than the Tamron 70-300mm f/4-5.6 even stopped down. The ability to shoot wide open without worrying about quality is really nice; click either image above to see a bigger version.
I am planning a more in depth review/comparison between the Canon 70-200mm F/4 and Tamron 70-300mm F/4-5.6 but I'd like to get a bit more time with the Canon before I do it.

Below are 100% crops of heron shots from both lenses:

100% crop from Canon 70-200mm F/4 USM
(ISO 200, 200mm, F/4, 1/2000 sec, processed in RAW)

100% crop from Tamron 70-300mm F/4-5.6 Macro
(ISO 400, 300mm, F/7.1, 1/400 sec, JPG)

Obviously, there are some differences between how the two images were shot: the Canon was at a shorter focal length, faster shutter speed, lower ISO, and used RAW processing. By the way, the Tamron shot is from this day, but is pretty indicative of how the Tamron performs (at 200mm it is slightly sharper though). My general feeling is I don't need to worry about the image quality of the Canon, while I have to keep the Tamron from being wide-open and avoid situations where chromatic abberation would get too bad.

Of course, the Tamron cost less than $100, while the Canon cost $500. I still contend the Tamron is still a great value for the money.

Thursday, May 24, 2007

Review: Reversed Nikkor-H 50mm F/2

Background:

Over three weeks ago I ordered a used Nikon Nikkor-H 50mm F/2 lens off eBay. It came a few days later and I've spent enough time shooting with it that I feel like I can write up a little review. Since I shoot Canon, my only reason for purchasing this lens was to use it as a macro lens.

First things first though. I bought the lens for under $20 including S/H when they usually go for a bit more ($25-30). Upon receiving the lens, I checked it out thoroughly, and there is nothing at all wrong with it, so my calculated risk paid off.

The 52mm reversing ring is currently available on eBay for about $12, including shipping. Make sure you get the right mount though: one side will be a camera bayonet mount (Canon EOS for my Digital Rebel XT) and the other side will be a male 52mm filter thread. Just screw it on to the lenses filter threads (52mm is the most popular filter size for 50mm lenses) and attach it to your camera like a normal lens. Shooting takes a little more technique than usual, but more on that later.

The short version is I am very happy with my Nikkor-H 50mm f/2 for macro work. But, like any reversed lens for macro, it has a few limitations. If you have the money, you're generally better off getting a new dedicated macro lens. But, if you are financially impaired, I would say an old, AI (or pre-AI) Nikkor/Nikon lens is your best choice for a dedicated reversing lens.


Physical Description and Operation:

In the image at the top of the post you can see the Nikkor-H in full macro mode. Moving from left to right, there's the Nikon lens cap (since that end would normally go on the Nikon camera), the aperture wheel (going from f/2 to f/16 in full stops), the focus wheel (which doesn't really matter for macro work), a 52mm EOS reversing ring (more in a bit), and finally a Canon lens cap. This is how I store it, since I don't need the reversing ring for anything else.

The lens itself is from an earlier era, so almost all of it is metal. Compared to a Canon 50mm f/1.8 (see left and right, click for larger image) it is just about the same size and uses the same filter size (52mm). The Nikkor-H is slightly heavier and much more solid because of the metal construction. While I always felt like my Canon 50mm was on the edge of breaking when it was reversed mounted, I have no such concerns with the Nikkor. This thing is solid, and it better be, considering it is about as old as I am. Also, because the Nikkor-H was designed for old manual cameras, it has a lot more levers and other projections (don't hurt yourself!) and doesn't fit on newer Nikkon cameras.

Both lenses have similar optics and the primary distinction between the two is the newer Canon includes autofocus and auto-aperture while the Nikkor has manual everything. When reversed, the focus is generally useless anyway, so no auto-focus is not a problem. The ability to set the aperture on the barrel instead of the usual Canon aperture dance (unmount, put it on the right way, set aperture on body, hold DOF preview, remove and reverse) is very convenient and allows me to take better pictures because I can change the aperture instantly. It also is a big help in focusing because you can open up the aperture, get your focus, then stop down before you trigger the shutter.

Speaking of stopping down, the Nikkor-H has one feature that I didn't know about before I bought it: it has a lever on the mount that lets you momentarily open up the aperture. The lever is circled in the picture at left (click it to see it larger). Originally, this is how the camera body allowed the lens to be wide open when using the viewfinder and stopped down when shooting pictures. While a little awkward to reach, it conveniently lets you pop open the aperture to focus, then stop down right before you shoot. Very handy, and something an old Canon FD lens won't do (in fact, quite the opposite: FD lenses are stuck at one aperture unless you pull a lever).

One of the few advantages the Canon 50mm has over the Nikkor-H 50mm is a larger aperture range. The Canon can stop down to f/32 while the Nikkor can't go past f/16. This isn't too much of a problem unless you need extreme depth of field. On the plus side, the Nikkor has 6 aperture blades instead of the Canon's 5, so bokeh should look a little nicer.

The 52mm reversing ring screws onto the Nikkor 50mm f/16 nicely, but it doesn't stay very well; I sometimes unscrew it on accident when using the aperture control. Not a big deal, but something to keep in mind. Once on, the reversing ring acts as part of the lens and feels very solid (unlike the Canon 50mm, which has a lot of slop between the lens barrel and focus section). Reversing the lens also puts the aperture control conveniently at the end of the lens.


Shooting Macros with the Nikkor-H 50mm F/2:

I find the Nikkor-H 50mm f2 much more convenient to use than the Canon 50mm f1.8 II because I can open and close the aperture as needed to get focus without removing the lens. Optically, I've noticed no difference between the lenses, and both give me good shots. As is the case for most macro work, the final sharpness of the image is usually more of an issue of technique than the quality of the lens.


This is the usual process I go through to get a shot:
  1. Set the camera to aperture priority (Av) mode. This lets the camera meter determine the right shutter speed (my aperture display always says 0.0 because it doesn't detect a lens). Depending on the shot and lighting issues, I may use full manual mode to set the shutter speed myself.
  2. Open up the aperture to f/2 or f/2.8 to get focus. I'm almost always using a tripod on a stationary subject, so I use a wide aperture to make it easier to see the scene in the viewfinder and get focus.
  3. Stop down to my desired aperture and meter the scene. If necessary, I'll change the ISO to make sure I get a fast enough shutter speed. With macro shots, I need a higher shutter speed than I would generally use (even on a tripod) because a tiny motion of the camera or subject will be magnified into a large motion in the image.
  4. Wait until the right moment and press shutter release. Unless I've got a really high shutter speed, I'll use my homemade remote release. I'll usually use mirror lockup to keep the mirror from wiggling the camera on the tripod too.
  5. Check the histogram and shoot again. I'll often bracket exposures and even bracket apertures (take a range of shots with different apertures) to make sure I get a good shot.
The Nikkor-H 50mm f/2 improves this whole process because it makes aperture changes instantaneous and doesn't disturb the camera position. In the past few weeks, I've taken some macro shots of the flower I mentioned earlier and a penny. There's something else going on in the penny image, but that's a topic for another post.

There is one big disadvantage of the Nikkor-H 50mm f/2 (or any reversed lens): you cannot easily change the field of view. With a relatively fixed focus point (since the focus wheel doesn't work), you cannot easily move closer or farther from the subject, making it difficult to frame the subject. Yes, you can use extension tubes or bellows, but they don't help you zoom out past about 1:2 magnification. Sometimes I get frustrated when I want to include more in the image but physically can't. At that point, I switch to a non-macro lens and plan on cropping the image in post processing.


Conclusions and Future Plans:

For about $40 you can get an old Nikkor-H F/2 on eBay with a 52mm reversing ring. That, other than a tripod and remote release, is all that you need to start out doing macro shots. As far as I have noticed, the quality of the shots are similar (but probably not as good) as a true macro lens, the main difference is in the convenience of use. If you have more patience than money, this might be a great way to get started shooting macro photographs. But, if you have the money ($300+ for a decent macro lens), you might as well get a real macro lens and enjoy the convenience of it.

Personally, a 90-100mm macro lens is next on my list of hardware acquisitions, but it might be a year or so before I get one. For now, this $40 combination meets most of my needs.

If I need more magnification than 1:1, I have a cheap set of extension tubes ($15 on eBay, shipped) which gives me about 2:1 (2x) magnification. With the addition of a male-male macro coupler (two 52mm screw mounts on each side) and one or more step-up rings, my Nikkor-H can be reversed in front of my other lenses to get super-macro images (beyond 2:1). At some point I'll grab what I need on eBay and experiment with it. I'm also considering closeup lenses for my Canon 70-200 f/4 to see how well that works.

For now though, my Nikkor-H has joined my other lenses as just another tool for getting the best picture.


Update:

Here's a handy eBay search for the 50mm Nikkor lenses. Sadly, eBay has recently updated their editor kits and ruined some of the functionality. So, to really look for a Nikkor-H f/2, plug "Nikkor-H (50mm, 50) (f/2, f2 2)" in the search box and you'll get better results.


Tuesday, May 22, 2007

11 Tips For Photographing Children


Last Wednesday I did a family shoot for a friend, specifically her children L. (about a 12 months old) and J. (about 3 1/2 years old). It went well, and although many of the photos didn't turn out, many turned out great. I learned a lot. So, I thought I'd digress a bit and give 11 Tips for photographing children before I get into my business plan in the next few days.


Yes, I did actually say business plan.


Obviously, I'm no expert with one shoot under my belt, but I did learn a few things.

1. Expressions are way more important than technical greatness. After all, you are shooting for the adult family members (parents, grandparents, etc). Really parents just want a record of their kids to aid memory later in life, don't try to make them too arty. If the lighting isn't perfect, they'll forgive you as long as their children look cute.

2. Be flexible. I can't stress this enough, nothing with children goes according to plan. I had all these planned shots I wanted to get, but the best ones were the ones I set up in 30 seconds on the fly.

3. Don't expect them to listen to directions. I mean seriously, if my kids don't listen to me, why should anyone else's? Really, though, it means keep it simple. If the kids listen, great. If they don't, move on.

4. Play houses are gold for portraits. Most of the photos that came out were in the play houses. The transparent walls make for some nice diffuse light, and there are tons of activities in them.

5. Ask them to lean on something. This may be for all portraiture, but giving them something physical to do will keep them occupied. I asked J. to lean on the window of one of the play houses (demonstrating myself) and he quickly obliged, going from serious and thoughtful to wacky in a few frames, and all of them turned out great.

6. Play with the kids. If you want cute shots, you HAVE to play with the kids. Otherwise they're going to look at you like you have four heads the entire time, and nobody wants to put a picture of that on their mantel. That's how I got J. to go from serious to laughing (see right) in about 30 seconds.

7. Babies like to touch your equipment. Yeah, I planned on using the Sunpak 383 balanced with the ambient to add some interest to the shots, but L. went right after it. One tug on my eBay slave trigger and I decided to put it away. I did let him explore the light stand a bit, that's where the lede image came from.

8. Bring props. Presenting children with toys that are new to them is the most reliable way to make them forget about you and the camera. Make sure those props can be chewed on. Another little-known fact is that even older kids will play with any new toy you hand them.

9. Don't prematurely delete photos. I thought I was doing a good thing to pare down the photos right after the shoot (eliminating bad shots and bad expressions) but after I did it, I regretted it. For instance, I had two shots of L. with the light stand, and I got rid of the one which showed the stand more clearly because I figured I had two and the parents wouldn't be interested in it. BUT, when I started work on this page, I immediately wanted it back as the lede.

10. Delete the technically bad photos. Or at least don't show them to the parents. And, yes, I know this is directly opposite of #9. This is the deal: the shot at right I included in an e-mail to the parents right after the shoot (really cute). When I looked at it in more detail, I realized it had horrible focus (probably because I was playing peek-a-boo with L. at the time) and the huge bright spot on his head will be impossible to remove. Clients generally won't understand that it is impossible to fix focus problems, but if you show them the photo, they'll want to. My new motto is to delete the technically flawed photos I would be ashamed to show as my work, and any redundant or blah expressions. But keep everything else, just in case.

11. Make sure the parents sign a model release. Otherwise, all your work is for nothing. A step farther, I'd say walk them through the process so no mistakes happen. Without the model release, I can't include the photos on this page or use them in my portfolio. Last Wednesday, it went pretty smoothly, but I regretted not talking it over with them (they just read it over and signed as I got started).

If you like looking at pictures...

Sports Illustrated has a set of galleries of Favorite Shots by SI Photographers. Check it out -- mostly basketball and football, but really nice shots.

Oh, and if you click on the More Photos button, you can see even more photos they have online from SI photographers.

Including cheerleaders.

You know, if you are into that sort of thing...

Sunday, May 20, 2007

Quick Tip #6: Add RAW To Your Trick Bag


If you know what RAW is and understand how to use it, you can probably skip this tip. If you don't (which seems to be a lot of photographers, including some professionals), you might want to give it a read.

RAW is an image format, just like JPG or PNG. The difference is, a RAW file contains all the data from the camera sensor instead of a processed version. Essentially, a RAW file is a digital camera negative. Each camera maker (and sometimes each camera model) uses their own RAW file format, but most popular software can process the files from most popular cameras (Canon, Nikon, Sony, etc).

WHY use RAW? To get the most data from your images. Humans can only distinguish about 8 bits (256 shades) of light intensity per RGB component. Monitors only show about 6-8 bits. But digital cameras collect 12-14 bits per pixel. The result is a file that contains more data which you can't see (and is 3-4 times larger). Why is that useful? That invisible data lets you bring own shadow or highlight details. It also lets you recover information if you make an exposure mistake.

HOW to use RAW? While Photoshop, Picasa 2, and Paint Shop Pro XI (among others) have RAW support built in, you are often better off using a stand-alone utility. There are many utilities out there, and many cost a pretty penny. But, RawShooter Essentials 2006 is completely free, very powerful, and very fast and easy to use once you get used to it.

Although Pixmantec was acquired by Corel (and RSE is no longer supported), RSE can still be found on the web at places like download.com. It will bug you when you start it about trying to reach a server, but it works fine once you click through the initial window.

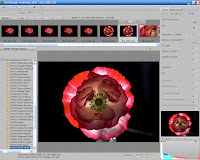
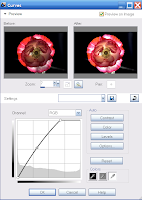
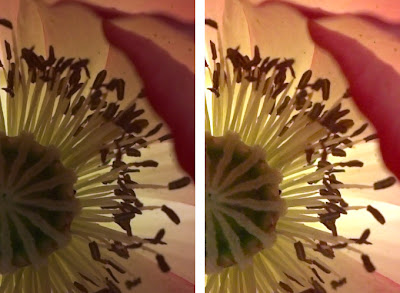
WHAT does RAW let you do? Well, take the backlit flower at the start of this article. To set this up, I placed my trusty desk lamp behind the flower and shot into it, but because I didn't want to blow the highlights the center ended up being too dark. So, since I took the shots in RAW, I exported from RSE to a 16-bit TIFF, loaded it in PSP XI, and used Curves to bring out the details in the center (PSP XI allows you to use Curves in 16-bit depth). At right you can see the Curves screen, and see just how much I adjusted the exposure and boosted the shadows.

Before and after results from the flower center are below. I don't usually bother with RAW unless I'm shooting for a contest or for future printing; in other words, only when I'm going beyond a simple snapshot and I might need to do some heavy adjustment later.

RAW is just one more tool you should know how to use.

Saturday, May 19, 2007

Canon 70-200mm f/4: An Impulse Purchase

I've been seriously considering the purchase of a Canon EF 70-200mm f/4L USM especially with the current rebate going on. So when I heard on DPChallenge that Amazon is doing double rebates (possibly inadvertantly) I jumped at the chance to pick up the cheapest Canon L (for luxury) at a good used price.

Why am I, a poor grad student who tries to save every dime when it comes to photography equipment, buying a $490 lens (after rebates)? The short version is I'm thinking of going Pro (well, maybe not pro, but making a little money). The long version will have to wait another week or two to come out.

But, needless to say, I am extremely excited. I love new hardware!

I did super-saver shipping though, so I'll need to wait two weeks to get it :(

[Update 5/21: The lens shipped today, it will show up tomorrow, AND the sale is still on. Amazon's page listing the discounts is here. Current detail page here.]

Friday, May 18, 2007

Quick Tip #5: White Balance

[It has been a while since I've added to my Quick Tip series because I've been waiting for a decent image or two to illustrate the tips. Well, I finally got some images, so I have another Quick Tip waiting in the wings for posting in the next few days.]

[Oh, and if anyone knows the type of flower I've pictured in this entry, leave a comment. I haven't been able to figure it out (I haven't tried that hard either).]


Key Idea: Taking a minute or two to consider white balance before you start shooting may save you hours of post processing.

If you agree with that and know how to manage white balance in camera, you can safely ignore this post. Well, unless you want to hear more about the image above. I'll wait a second or two for the know-it-alls to leave...

. . .

Still with me? Let's start at the beginning.

White balance (a.k.a. color balance) refers to the representation of white in an image. Wait, you're thinking, isn't white just equal amounts of red, blue, and green? Well, yes and no. In a perfect world, all white would always look the same. In our world, our eyes compensate for the color of the light so that white objects still look white, EVEN if they aren't truly white. If you've ever looked at paper under a colored light (I was cursed with a green nightlight during my early teens), once your eyes adjust it will still look white even though logically you know it isn't. For our eyes, white is relative to the ambient light. For a camera, white is absolute based on the sensor chip.

As an example, during the rainy season (October through May) we have a light green tarp over half of our back patio. As a result, our living room is bathed in green light through the sliding glass door, while our dining room gets normal skylight. The greenish cast in the living room is generally unnoticeable unless I am either: A) taking pictures or B) editing pictures on the living room computer. Then, if the camera detects the wrong white balance, everyone looks sickly green. When using the computer, I have to put a black blanket over the window so the green ambient doesn't add a magenta cast to the monitor image.

The solution is to set the white balance on your digital camera, which modifies which ratio of red, green, and blue corresponds to white. On my camera (Canon Digital Rebel XT/350D) I can set it either in the menu under White Balance or directly by pushing the WB button (down on the directional). Most cameras provide sunlight, florescent, tungsten (incandescent), cloudy, and flash white balance. Often cameras do automatic white balance and extract the most likely white balance from the image. And auto white balance (AWB) works fine... most of the time.

Case in point -- the above flower shot with a daylight white balance looks like crap. When I shot it, I used a florescent desk lamp (the cheapest lighting solution EVER) which doesn't get hot enough to wilt a flower like an incandescent. The down-side is the lamp has a really strange color balance that doesn't correspond to any Rebel XT setting.

In the interest of full disclosure, after an hour of shooting the flower must have taken some heat. In the morning it had lost three petals, and by the next evening it was totally naked!

When will auto-white balance not work? Lets say you take a picture of an orange flower. If there is no white in the image, there is no way for the camera to tell what the white balance really is and no way to get the orange color perfect. Even worse is florescent lighting -- the spectral emissions from florescent lights vary wildly and the florescent setting on the camera will not fit your lighting. So, what can you do?

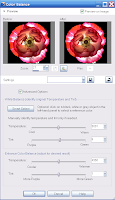
Well, you can always set it in software. At left is the Paint Shop Pro XI color balance control. WB is represented by two values, usually color temperature (red-blue mix) and tint (green-magenta mix). Sadly, these controls are not very intuitive and it is hard to adjust color balance manually especially if your monitor is not calibrated to your ambient. Luckily, most software lets you select something that should be white in the image and figures out the right WB for you (called Smart Select in PSPXI).

The thing is, fixing WB in software is an extra step in your post processing -- if you've got 100 images to process, you don't want to be doing it for each image. Also, many times you can't get it right in software because your image lacks a pure white that isn't blown out. That usually won't matter for snapshots, but if you want to submit your photo to a contest or print portraits for a paying customer, you really want to get WB right.

The solution is simple if you have custom color balance. The short version is: shoot a white object, set the custom color balance based on that image, and as long as you don't vary the lighting, all your later pictures will be spot on. Do you need to get a $50 ExpoDisc? No, any white or gray paper will do as long as it doesn't have a color tint. Here's the process on the 350D:
  1. Hold a piece of paper, gray card, or whatever in the position of your subject and take a picture of it. White balance does not matter at this point.
  2. In the menu, select Custom WB, scroll through to select your target image, and press Set. The custom white balance will be set automatically from the image.
  3. In the white balance screen, select Custom. It should be in the lower right.
  4. You are good to go until your light source changes!
It literally takes 30 seconds from start to finish, but it does wonders to your images. In the case of my flower above, I set it with a piece of printer paper. Checking later in my raw converter, daylight would have been: 5700K, Tint 4. The custom white balance was: 2850K, Tint 39. IMO, those are pretty extreme values -- my Ikea desk lamp has pretty strange color balance :)

I'll leave you with one more unrelated thought. The picture that started this section was taken with my Canon 50mm f/1.8 II with only resizing and sharpening. If you are used to Canon cameras, the saturation should surprise you. So, yes, the flower really was that brilliant and the color and sharpness of the lens is astonishing for something under $80. To back that up, a 100% crop without any sharpening or processing is below.


Note: Copier paper may not be the best thing to set white balance outside because the UV light seems to cause the paper to appear more blue than it should (making your images appear too orangish). Investing in a gray card (or finding something more consistent) might be worth it if you shoot a lot outdoors.

Thursday, May 17, 2007

Canon Lens Instant Rebates!

Today Canon USA announced they'll be offering instant rebates on many of their popular lenses until July 16th. The rebates are significant (none of those silly $10 rebates) and have already appeared at online shops like B&H and Amazon.

See Canon USA's site for more details, but if you have been thinking about purchasing a new lens, this is a great time to do it. Personally, I've been planning to get a Canon EF 70-200mm f/4 as my next lens, and now that they are $50 off (and listed at B&H for $530) a new lens is suddenly about the same price I'd be paying for a used lens. And I'd get a USA warranty with it. Cool!

The full list of lenses and rebates (and their current price after rebate at B&H):
$100 Rebate:
70-200 f/2.8 L IS USM $1,600
100-400 f/4.5-5.6 L IS USM $1,310
85 f/1.2 L II
USM $1,670

$75 Rebate:
70-300mm f/4-5.6 DO IS USM $1,070
24-70mm f/2.8 L USM $1,065
400mm f/5.6 L USM $1,025
180mm f/3.5 L USM Macro $1,165
70-200mm f/4 L IS USM $985

$50 Rebate:
70-200mm f/4 L USM $530 <= best telephoto price/performance ratio! 17-55mm f/2.8 IS USM $950 <= rich person's Tamron 17-50mm
17-40mm f/4 USM $630

$25 Rebate:
28mm f/1.8 USM $375
50mm f/1.4 USM $285
60mm f/2.8 Macro USM (EF-S) $360 <= cheapest Canon 1:1 macro


I have no idea why Canon is doing this. Most of these are the higher-end lenses (maybe they're trying to boost sales?) too, but the discounts are close to 10% in some cases. If you were thinking about a lens, this is a great time to buy!

Personally, I'm going to do everything in my power to get the money for a 70-200mm f/4 USM before mid-July!

My birthday is coming up soon too (hint, hint) :)

[Update: I managed to get a really good deal on the 70-200mm f/4, so think of something else for my birthday. Like maybe a macro lens; I'd prefer a 90-100mm prime, but I'd take the 60mm macro if it was offered :)]

Wednesday, May 16, 2007

Search Engines and Affiliate Marketing

Looking through my Google Analytics results yesterday morning, I noticed that I've never, ever gotten a referral from a search engine other than Google. Furthermore, it looks like none of my new entries from the last few weeks are getting hits. So I did a searched the web for a good guide to getting listed in the major search engines.

My old friend Google came up with How to Get Listed... which describes how and where to get listed (including direct links to the URLs to add your site). A useful little site and a quick read. From what I read (at the site above and elsewhere), new website owners should submit to the big three search engines (Google, Yahoo, MSN). Then, submit to the Yahoo Search Directory and The Open Directory (details in the link above). Now I just need to wait until something actually happens :)

I also started to wonder: just how out of date is Google's index? How soon will my new pages be listed in Google? So I started searching for my pages in Google (just prefix your web page with site:, like site:stanfordphoto.blogspot.com). Yeah, none of my new entries showed up. I tried the same thing (same syntax even!) in MSN and Yahoo and came up with nothing, verifying I wasn't in their indexes. So I looked for more info...

And that was when I stumbled upon Google's Webmaster Tools. It turns out that Google gives you a bunch of information about how Google has indexed your site, so you can optimize your pages and address problems that might cause trouble. Like many sites, you have to verify you own the site (by posting a meta tag in your template) but it is a pretty painless process. This is what GWT told me:

Googlebot last successfully accessed your home page on Mar 28, 2007.

Wait, what? Google hasn't looked at my site for over two weeks? No wonder none of my new info is in the index. The first order of business was to resubmit the site to be crawled (maybe I'm not supposed to do that, but I did -- I did it yesterday, and it hasn't been updated yet). I also told Google to crawl my site faster. Part of the problem might be the chronologic nature of a blog: old entries don't usually link to new entries. Supposedly I can submit a site map to Google to help it crawl, but I'm not up for that just yet. I'll keep you posted when I get some more data from GWT.

Also, I went through some of my old posts and purposely misspelled some things (such as SB20 instead of SB-20 in this post). I noticed some searches came through for SB20 and I wanted to make sure they'd hit me. Also, I made sure that common (and useful) searches like review nikon sb-20 would go to my pages, adding common search words into the text as much as possible.

Along those lines, it is important to search for your site both directly (using the site name) and indirectly (using common searches for the types of things you talk about). It is a great way to see how important your site is (based on how high it appears in the search rankings) and, more importantly, it verifies that someone looking for your site can actually find it. Especially if you have any clients (photography or otherwise), if they can't find your site, you'll lose money.

On that note, I searched for stanfordphoto today (in case anyone couldn't remember the web address) and I was second on the list, behind www.stanfordphoto.com... I'm ok with that.

Then I searched using the keywords please excuse me while clean lens and my site was the top of the Google list. Excellent.

On a lark, I tried it in Yahoo search even though I didn't expect anything to come up. Interestingly enough, there was a site that included the name of my blog! So, I checked it out and it turned out to be Sphere, some sort of blog entry aggregation site. I guess I'm ok with that, but my first thought was that it was some affiliate marketer stealing my content.

Wait, let me back up. Affiliate marketing is a method of making money on the web (and in real life, too) where you draw people in with good content, refer them to another business or site to purchase something, and receive money for the referral. The primary purpose of an affiliate site is to attract a bunch of people that will click on links. One of the best ways to attract people is to post good articles that show up in search engines. Many affiliate marketers are very savvy businessmen (and businesswomen) but some of them are sleezes that will copy/paste other people's articles directly onto their site without even a link. The easy way to detect content-theft is to do a self-search every once in a while.

If you'd like to know more about this, I recommend reading Gadooney, an affiliate marketing guide. It is chock full of useful information that can help you promote your blog and even make some money off of it. For instance, his search engine articles really go into a lot of detail about increasing your hits.

I originally heard about the owner of Gadooney, ScurvyDog, through his poker blog (which even includes advertising info!). It really is amazing how he can make a site like HateNinja generate money for him. All Scurvy has to do is search YouTube for interesting videos and talk like a strange Japanese guy (check it out, it really is interesting).

Anyway, I have no intention of making this blog that commercial. But I do feel like I have a lot of interesting stuff to share with the world and I want to get as many people to see the blog as possible. That means I need to figure out how all this search stuff works. And hopefully, from these recent posts, maybe you've learned something too.

Oh, and don't worry, I'll let you know how long it takes Yahoo and MSN to get me into their indexes.


Update 5/21/07:

Google finally rescanned my page on 5/20/07, five days after I requested it. Well, they say they did it on the day I requested it, but it may not have hit their active files until last weekend. I have noticed an increase in my search hits (from an average of 1-2 to 3-4 a day) and my new stuff is getting decent interest. On the flip side, my referrals from other sites have gone way down in the past few days.

I appear to be listed in Yahoo and MSN, but not all of my pages (mainly just the entrance URL I submitted). I assume they'll crawl it at some point in the future, but as yet, I've seen no searches from them.

Oh, and today I got an e-mail about another site I manage (a local garden site). I haven't maintained it in over a year :) Apparently, someone wants me to link to them even though my site is very old and out of date. In the requester's words:
"While I can't promise a link back I am more then open to coming to some sort of arrangement."
Like what? You'll do my dishes? Purely a plee to increase their PageRank. I may not even respond.

Tuesday, May 15, 2007

Blog Links I Like

So, when you have a special hobby you like to read about, such as photography, it is natural to look for the blogs of other people with the same interest. You can either spend a ton of time searching for good blogs (and sifting through a ton of medeocre ones) or you can find someone else who has already done the work and just look at their recommendations.

You know me, I'm not one to waste time on the computer. Oh, wait, yes I am... **cough** **cough** **procratinator** **cough**

Anyway, since my time is at a premium, I appreciate it when Wiedebas does the work for me by putting together a list of good photography blogs. And I'm not just saying that because I am second on the list! Specifically, I found the following blogs really interesting:
  • Photomedic: This is my favorite of the bunch, and not just because he has lots of pictures of pretty women on his site. It is because he tells me how to take good pictures of pretty women! Medic (so called because he also is a paramedic) goes into a lot of detail of the lighting of his shoots and I find his site to be very clean, readable, and enlightening. I'm definitely going to read through each and every post.
  • The Online Photographer: Mike Johnson is an interesting read and has a lot about cameras and lenses. Make sure to read his opinion on point and shoot cameras (short form: they are pieces of sh*t, but get one anyway and learn how to use it).
  • A Story As Told By Sang: The pictures are really what you should go to see on this site. Sang does have a bit of information too, but his pictures are the real draw for me.
While I'm mentioning notable blogs, don't forget about the following business blogs:
  • John Harrington's Photo Business News & Forum: This is a gem if you ever imaging going pro or semi-pro. It has a ton of useful information about managing the business side of photography. One of the few photography blogs for which I've actually read every single entry.
  • Dan Heller's Photography Business Blog: I stumbled upon this while looking for the above link, but it looks really useful. Check it out.
The best part about this post is I'll be able to find these blogs again if I forget about them :)

Check that out, I made it through a whole post without mentioning Strobist.

Oops, nevermind.

Monday, May 14, 2007

Review: Nikon SB-20

My original plan was to do a Sunpak 383 vs Nikon SB-20 comparison article, but the two flashes really are in separate price brackets. While I will compare the SB-20 to the Sunpak 383 in this review, it is primarily about the SB-20. So before I get into the SB-20, lets give an overview of the Sunpak 383 and the options for cheap off-camera capable flashes in general.


Popular Shoe-Mount Flashes for Off-Camera Use

The standard for low cost off-camera flash (learn to light at Strobist!) are the used SB-24 ($70+ including S/H on eBay) or the used SB-26 ($90+ including S/H on eBay). Many have written about these, so I won't spend any time on them (especially since I've never even touched one).

But, if you want to get a new flash with manual capabilities and not spend a lot, the Sunpak 383 ($80 including shipping on Amazon) and Vivitar 285HV ($95 including shipping on Amazon) are your main options. All of these have a safe sync voltage for modern digital cameras (including the Canon 350D/Digital Rebel XT. Please note theVivitar 285 (non-HV) does not have a safe sync voltage, so don't buy a used 285 and then get mad at me that it fried your camera!

If you have $80+ to spend and some time, get an SB-24 or SB-26 on eBay. It might take a while to find a good deal on a flash in good condition, but it is an excellent way to start.

If you have $80-$90 to spend on your first flash and you want a new one (or don't want to struggle with auctions), I say get the Sunpak 383. The Vivitar 285HV is a really close second, but the swivel option on the Sunpak 383 is worth it. The swivel option gives you a lot more flexibility with stand placement, allows ceiling bounce in portrait orientation (or wall bounce in landscape), and the ability to turn the sensor to face the subject when using an umbrella.

Both the 383 and 285HV are powerful, reliable, and can take a sync cable for off-camera flash. Be warned that the Sunpak has a proprietary sync connector (an extended 2.5mm phono jack), but I've found the standard length plugs from RadioShack work if you use a rubber band to hold the plug in. The 383 also lacks a zoom function, but I don't find that to be a big problem since any time I really want to control light spill I use a snoot.

Both flashes also work in auto mode: a photocell measures the reflected light from the subject and quenches the flash when a threshold is reached based on the aperture of the camera. This allows the flash to automatically compensate for a varying distance without depending on special circuitry in the camera. Both also have manual controls (switches) and no LCD screen, but sometimes I wonder if that is a problem or an advantage.


The Nikon SB-20


The Nikon SB-20 was originally designed as an autofocus flash for the F501 and the last Nikon flash which included manual settings but did not include an LCD screen. SB-20s are also very common on the used market now as people sell off their father's and grandfather's equipment. In my opinion, the SB-20 is now the best flash value on the used market. I got mine for $10.99 total because the guy didn't realize that corroded battery connectors prevented it from powering up. And I can even get a new battery door for $8 on eBay!

Look at what the Nikon SB-20 includes for the low, low price of $30 (including S/H) on eBay:

Nikon Quality: This unit actually feels a bit more solid than my Sunpak 383. Not that the 383 isn't solid, but the little things like the switches on the SB20 feel just a bit better. You know, even though the flash design is twenty years old, it still works like a champ. Overall, it is also a more compact flash than most and you won't worry about snapping the flash head off.

Manual and Auto Modes: The SB-20 includes both manual, auto, and TTL flash modes. Of course, TTL only works on older Nikon film cameras, but the manual and auto modes work fine on any brand of camera. In the manual mode, the flash will just pump out the desired power (from 1/16 to FULL). In auto mode, the photocell on the front of the flash will quench the tube when it detects enough light has hit the subject (exactly like the 383 or 285HV).

The SB-20 also has an infrared auto-focus assist light (behind the red transparent faceplate). So far, I haven't figured out a way to enable it (I'd love to stick a switch on somewhere) without taking the flash apart and risking damage.

Can Be Used on Any Camera: Wait, you may ask, aren't SB-20s Nikon-dedicated? Yes, but you can easily take out the Nikon dedicated pins and turn it into a generic flash just like the Sunpak 383 or Vivitar 285HV. See right for the finished product (I didn't have the right screwdriver so I couldn't take it apart again to show the inside).

First, unscrew the four phillips head screws holding the bottom plate and hotshoe on. Pull the plate off, being careful to not tug on the connecting wires too much. Remove the screw(s) that hold the hot shoe circuit board to the hot shoe and pull out all the pins but the center one (if I remember correctly, the springs stay in place on the board). Put it back together, and stash the extra pins somewhere safe. I just wrapped my pins up in a plastic bag and stuffed them inside a cavity inside the SB-20 so I wouldn't lose them.

After taking out the signal pins, the SB-20 works just like an undedicated flash and I've successfully mounted it on my Canon Digital Rebel XT (350D). It actually makes a pretty darn good on-camera flash with the tilt, zoom, and auto settings. And, since the mod above isn't a permanent change, you could always put it back together in the future to resell it.

Tilt and Zoom: The real oddity about this flash is its zoom and tilt capability using a single rotating reflector around the flash tube. The tilt is adjusted with a dial on the side of the flash (shown at right) and it includes a -7 degree setting (which is very useful for close up shots and lacking on the Sunpak 383). The zoom is adjusted by rotating the outside diffuser cylinder (in the picture at right, turn the textured black wheel on the right of the image). The pattern molded into the plastic controls the spread of the light. The current zoom is also indicated through a clear window on the tilt adjust dial (upper left in the picture). For auto modes, I think you also need to flip the zoom switch on the back of the unit to get it to calculate distance correctly.

The nice part about this system is the entire tilt-zoom assembly is compact and relatively durable since it doesn't stick out. The down-side of using a rotating cylinder to control the zoom is a small amount of light leakage around the sides of the diffuser, making it a bit harder to control where the light falls. But that is easily addressed with some cardboard and tape!

PC and Power Connection: Like any good off-camera speedlight, the SB20 includes a standard PC connection and an external power connection (shown at right). I haven't actually used either (I use a hot shoe adapter to an eBay wireless trigger) but I'm sure they work fine.


Is the Nikon SB-20 Right For You?

If you've got the cash, make your first flash a Sunpak 383, Vivitar 285HV, SB-24, or an SB-26. Of course, if you have tons of cash, buy the newer model flash for your camera which supports TTL! But most people don't have that kind of cash just starting out. The SB-20 makes an excellent second or third off-camera flash because it can easily be stuck on an optical trigger or a wireless trigger. It would be super effective as a background light or kicker (you could probably gel and snoot it too, but it might be a bit harder with the rounded head).

If you are truly poor, you know, grad-student poor, then the SB-20 might make a great first flash. You could mod it and start out with it as an on-camera flash with a ton of capability, and then later on get a wireless trigger on eBay to start playing with off-camera flash ($27-$30 including shipping, I recommend magic_trigger). You'll probably also need a PC cable or hot-shoe adapter ($6 from magic_trigger). Yes, the trigger and connector are more than the flash, but it is well worth going wireless, and much more reliable. Then, if you decide it is for you, get an SB-2X, Sunpak 383, etc and keep the SB-20 as a second (or third) light.

I've used the SB-20 with both an eBay wireless trigger and an eBay optical trigger. The optical trigger won't work outside unless the triggering flash is directly facing it, but works great inside and is super reliable. The wireless trigger seems to work well, although a week ago it started malfunctioning (a full-power blast, then nothing until I unplugged and plugged it in again). After swapping batteries the problem went away, so I expect it was battery related.

How can you get one? Search for "Nikon SB-20" on eBay and you'll usually see around five to ten units listed. Easy as that -- I've seen a lot of SB-20s floating around and they often don't get a lot of bidders. Garage sales, flea markets, and swap meets might also be great places to get one -- especially from someone who thinks they won't work on digital cameras!

The Nikon SB-20 is quite an oddball as flashes go, but that works in a poor photographer's favor. An SB-20 will give you a lot of bang for your buck, and for some of us, every buck matters!


Update: Here's the current SB-20s for sale on eBay right now! Mouse-over to see the details, click to see more options. I love these little gadgets...